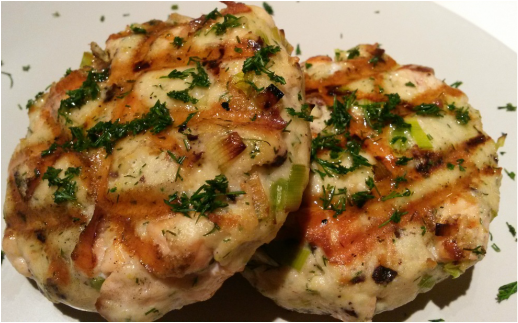
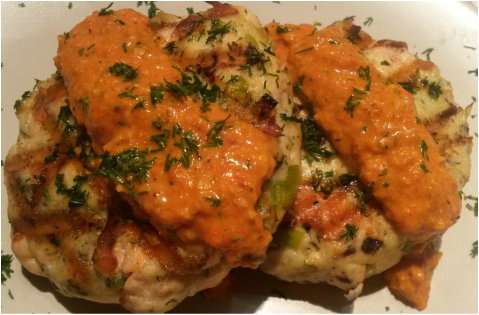
Gabrielle Myers Writer, Chef, and Teacher
  • Home
  • About Me
  • Too Many Seeds, A New Poetry Collection
  • Hive-Mind, a memoir
  • Farm to Fork Column Articles in Inside Sacramento
  • Photographs for Sale
  • YouTube Channel
  • Gluten and Dairy Free Recipe Blog
  • "A Sensory Journey," Learn About My Farm-to-Fork and Writing Journey
  • Video Poem "Lidded," from Too Many Seeds
  • "Live as the Tomatillo Reaches for Life on a Hot July Day," in Edible East Bay, Fall 2022
  • Two Poems in Edible East Bay, Spring 2022
  • A Review of Too Many Seeds!
  • Interview on Too Many Seeds on The Spark with Stephanie James
  • A Review of Too Many Seeds, Tweetspeak Poetry
  • "Food for Thought," a Q & A on Too Many Seeds
  • "Dried Bits," in Borderlands, Texas Poetry Review
  • "Vessels" and "Lost Amantes Saltan" in pacificREVIEW, Spring 2020
  • Video Poem: On Ayako's Pa Amb Tomaquet
  • Video Poem: Quality Control
  • A Review of Hive-Mind and a Recipe
  • Interview on Dr. Andy's Poetry and Technology Hour!
  • An Interview on Too Many Seeds, Author2Author
  • An Interview on Too Many Seeds, BITEradiome
  • Video Poem: Sonnet #69
  • A Video Reading from Hive-Mind
  • Video: On Poetry and Cooking
  • An Interview on Shirleymaclaine.com
  • Selection from Hive-Mind
  • Selection from Hive-Mind
  • "Early Fall's Failed Elegy," in Catamaran, Summer 2018
  • After Grass Against Sea, by Edward Weston, in Catamaran Fall 2020
  • "For Girls Who Walk Alone to the Bus Stop," in Connecticut River Review, Fall 2018
  • "Lover" & "We're There and Here," in Koan, Paragon Press, Summer 2018
  • "Fall," in The Adirondack Review
  • "The First Rain of Fall," in Fourteen Hills, 2010
  • The Art of Tomato Breeding
  • An Interview with Wendy from WINA in Charlottesville
  • Paul Canales: Building Community
  • Interview on Intuitive Ink Radio Show
  • Eat with Health in Mind
  • On Radio MD
  • An Interview with Allison Dunne from 51%
  • An Interview
  • “AN OCTOROON”: A DARING COMEDY ON SLAVERY, AT BERKELEY REP
  • An Interview with Robert Sharpe of BITEradio.me
  • Amazon Author Page
  • How to Use Your Daily Commute to Flourish
  • "Sonnet #69" in MadHat Lit
  • "I Am a Figure of Speech," Wallace Stevens Journal, Spring 2015
  • ‘Spread Like a Veil Upon a Rock’: Septimus and the Trench Poets of World War I in English
  • "Lament for My Sister at Harvest" in Damselfly Press
  • "Woman," "Pleasant Valley," and "Laura" in the Solitary Plover
  • "Prom Night" in Work Literary Magazine
  • "To Bukowski" in The Evergreen Review
  • YouTube Video of "The First Rain of Fall" (published in Fourteen Hills, Fall 2009)
  • YouTube Video of "Sonnet #69"
  • YouTube Video of "Bird"
  • YouTube Video of "Last Night in the Castro"
  • Linktree Page
  • Contact

Cherry Tomato & Basil Salsa

8/5/2016

2 Comments

 
Picture
Picture
 Serves 4
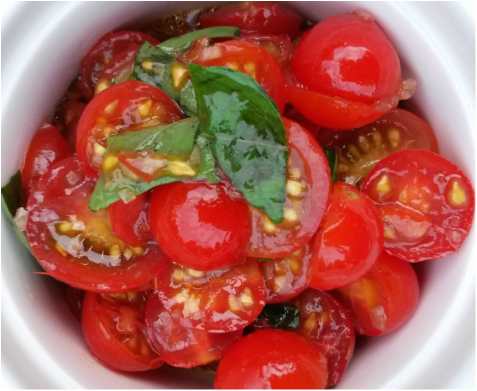
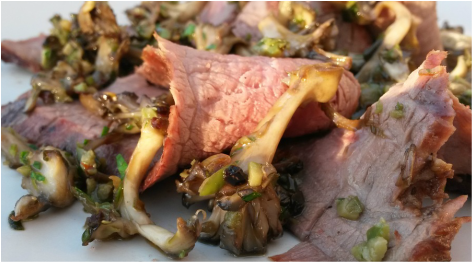
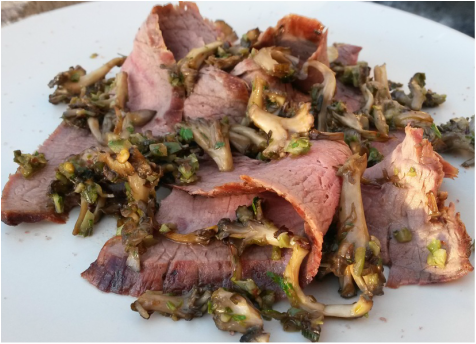
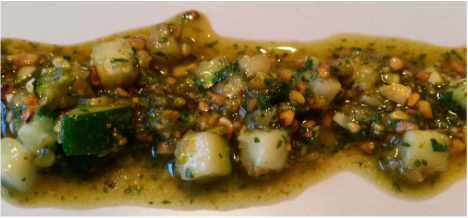
            On hot summer nights at Oliveto Restaurant, we would sear thin rib-eye steaks on a mesquite-fired grill and top the steaks with sliced cherry tomatoes mixed with a little garlic, olive oil, and fresh torn basil. That sauce inspired this more spicy cousin. With a hint of hot and bell peppers paired with the sweet and sour kick of Balsamic vinegar, these piquant additions allow the salsa to stand up to a range of meats and proteins, from steak, to pork chops, to braised tofu, to white beans, to hot honey mustard chicken (see below).
            Visit your local farmers’ market for fresh cherry tomatoes that have a nice balance of sweetness and acidity. This salsa tastes best when prepared within an hour of serving. If you salt the tomatoes too early before serving, the salt will draw out their water and they will lose their firm texture.
 
2 cups mixed cherry tomatoes
2 cloves garlic, crushed
1 tablespoon red bell pepper, finely chopped
2 teaspoons balsamic vinegar
¼ teaspoon red pepper flakes
2 tablespoons extra virgin olive oil
8 leaves of fresh basil, torn
salt, to taste
 
1. Crush the garlic and place it in a stainless steel bowl with the two teaspoons of Balsamic vinegar.
2. Wash, destem, and cut the cherry tomatoes in half. Place them in the bowl.
3. Finely chop the pepper, and place it in the bowl along with the red pepper flakes.
4. Let the ingredients marinate for about 30 minutes.
5. Add the olive oil, salt, and torn basil.
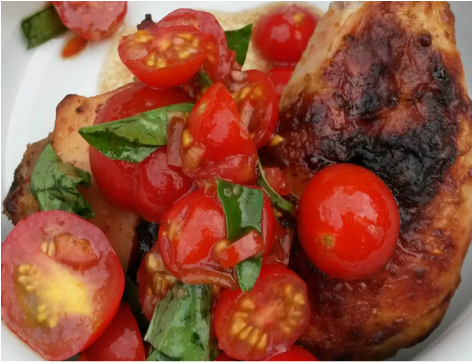
6. Serve the salsa by spooning it over grilled or roasted meats, braised tofu, or cooked white beans. 
2 Comments

Calabrian Pepper, Honey, & Dijon Chicken (Hot Honey Mustard Chicken)

8/5/2016

0 Comments

 
Picture
Serves 4

​​This easy to follow recipe yields tender, tangy, knee-slapping chicken. The cured peppers’ spiciness, honey’s sweetness, and mustard’s sharpness play tango against the chicken’s flavorful flesh and skin. You can pick the title that fits your style or audience best, but the quick preparation and easy cooking process make this recipe perfect for a busy weekday night ‘let’s get it done’ dinner, elegant weekend dinner, or body-packed summer grill party. You can marinate the chicken beyond four hours, so if you want a painless dinner, get the ingredients in the plastic bag the morning before grilling, go to work, and come home and put the chicken on the grill.
 
1½ pounds of chicken thighs or legs, bone-in, skin-on
2 tablespoon Dijon
1 tablespoon honey
1 tablespoon Calabrian hot pepper, chopped (or 1 teaspoon red pepper flakes)
1 tablespoon olive oil
¼ teaspoon black pepper, ground
 
1. At least four hours before cooking, place all of the ingredients, except the salt, in a plastic bag.
2. Place the bag in the refrigerator. Allow the thighs to marinate for at least four hours, and then pull them from the bag, place them on a plate, and bring them to the grill.
3. Heat the grill to a medium-low flame and preheat the oven to 380 degrees Fahrenheit.
5. Season the chicken with salt.
6. Rub a well-oiled rag over the grill grates, and place the chicken on the grill.
7. Grill the chicken for about 6 minutes on each side, and turn the chicken often to ensure even caramelization.
8. Once the skin forms a nice brick-red crust and has cooked for 12 minutes, place the thighs in the hot oven to cook for another 25-30 minutes.
9. When the chicken is cooked through, pull it from the oven and top it with the Cherry Tomato and Basil Salsa (see above).
0 Comments

Grass Fed Beef Burgers with Caramelized Onions & Kale

7/2/2016

0 Comments

 
Picture

Serves 4, 6 ounce burgers
 
            The sweetness of caramelized onions and mild green kick of kale add moisture to this grilled burger without the negative health impacts of bacon or processed cheese. This burger has a juiciness that runs down your mouth with each bite, while it elevates the health benefits of grass fed beef with kale’s antioxidants.
            By pureeing the kale, its sulfur containing glucosinolates get transformed into indoles and isocyanates, compounds which are thought to inhibit bladder, breast, colon, liver, lung, and stomach cancer growth (NCI). In order to make the forming of the burger patties a smooth process, prepare the fresh kale sauce and caramelize the onions before you begin to assemble the other ingredients.
Check out this YouTube video on how to make the Kale and Lemon Sauce: https://youtu.be/5-FwChFSt-Y (and please subscribe to and share my YouTube channel!). 
 
1½ pounds grass fed beef (85% meat, 15% fat)
½ cup caramelized onions, small diced
¼ teaspoon red pepper flakes
¼ teaspoon fennel seed, toasted and ground
¼ teaspoon black pepper, ground
3 tablespoons fresh Kale and Lemon Sauce
1½ teaspoons salt
 
1. Place the ingredients in a stainless steel bowl and mix them well before adding the ground beef.
2. With washed hands, mix the meat with the other ingredients until the seasonings are evenly distributed. Set aside for 20-30 minutes in the refrigerator.
3. Get the grill hot.
4. Divide the mix into 4 portions, and form 4 patties.
5. Brush the grill grates with an oil-damp towel, and place the burgers on a medium hot grill.
6. Grill the burgers for 4-6 minutes on each side. Turn them often to evenly cook each side.
7. Serve the burgers with your choice of condiments or the following sauces: Kale and Lemon (yes, I suggest having the sauce on inside and outside of the burger!), Parsley and Olive (https://www.gabriellemyers.com/parsley-and-olive-sauce.html), or Romesco.

Kale & Lemon Sauce
 
This olive oil based sauce dresses up a variety of dishes in rich, grassy kale notes spiked with a zing of garlic and bright threads of lemon zest. Paired with bean burgers, poached vegetables, roasted chicken or fish, or used as a dipping bath for carrot or cracker, this simple and easy to prepare sauce allows you to ingest a significant amount of the cancer-fighting vitamin-packed kale without taking time away from other activities. 
 
1 bunch or 4 packed cups of kale, washed, destemmed, and dried
4-8 tablespoons extra virgin olive oil*
½-1 teaspoon salt
1 tablespoon Meyer lemon zest
1 medium garlic clove
1/4-1/2 teaspoon red pepper flakes
 
1. Place the kale, garlic, 4 tablespoons of extra virgin olive oil, ½ teaspoon of salt, red pepper flakes, and the Meyer lemon zest in a food processor.
 
2. Process until smooth. Taste the mixture for seasoning. If you prefer more salt, add it to the mixture and blend. If you are working with older, more fibrous kale leaves, add 3-4 more tablespoons of olive oil.
 
3. Serve the sauce immediately or spoon the mixture into a glass jar and cover it with wax paper or plastic wrap. Lightly press down on the paper to seal in the sauce and remove any air pockets. This will prevent the sauce from oxidizing. Use the sauce within three to four days.  

 
                                                  Works Cited
 
Cruciferous Vegetables and Cancer Prevention. NCI, n.d. Web. 10 Apr. 2016.


0 Comments

Charred Cherry, Balsamic, Fried Sage Relish

5/23/2016

0 Comments

 
Picture
Picture
Serves 4
 
            Charred Cherry, Balsamic, Fried Sage Relish sings spring into summer with its burst of concentrated cherry flavor. All too often cherries only appear loaded down with added sugar in desserts, but their tangy kick and firm flesh make them ripe for a savory relish that compliments brined and grilled pork chops, roasted chicken, or grilled fresh porcini mushrooms.
            A touch of Dijon, caper, and balsamic heighten the cherry’s balance of sweet and acid while creating a luscious sauce to pull through bits of tender meat or mushrooms*.
            To protect yourself, those you serve, farm workers, and the environment, buy ripe cherries from farmers who abstain from spraying their fruit with pesticides. Cherries contain high levels of anthocyanins and other antioxidants, and might help arthritis pain by cutting down on the inflammation caused by uric acid and C-reactive protein (Zuckerbrot; American Institute for Cancer Research).
 
2 cups, cherries (whole, stems removed, washed and dried)
½ teaspoon Dijon mustard
1 tablespoon capers, rinsed and chopped
1 tablespoon balsamic vinegar
2 tablespoons extra virgin olive oil
½ teaspoon safflower oil
salt, to taste
 
For the fried sage leaves:
¼ cup oil olive
8 sage leaves, fried (set aside until just before service)
 
1. Preheat the grill to medium high heat.
2. Wash, dry, and toss the cherries in a little safflower oil and salt.
3. Cook the cherries for 5-6 minutes. Turn them often to ensure that they char on most sides.
4. Take the cherries off the grill and allow them to cool.
5. With a pairing knife and clean hands, gently remove the cherry flesh from the pits and throw the pits away.
6. Roughly chop the cherries, and place them in a stainless steel bowl with the extra virgin olive oil, chopped capers, balsamic vinegar, mustard, and a pinch of salt. Gently stir the relish to make sure that all of the ingredients are mixed.
7. While the ingredients mingle, prepare the fried sage by gently heating olive oil in a small fry pan.
8. Test the oil by dipping a leaf into it, and if the leaf starts to slowly sizzle, then the oil is hot enough.
9. Place about four leaves into the oil at a time. They should fry in about one minute. As soon as the leaves stop sizzling, pull them from the hot oil with a metal fork and place them on a paper towel to rest.
10. Check the seasoning of the relish: you might need to add another splash of vinegar or pinch of salt.
11. Prepare the pork chops or chicken. Right before serving, spoon the relish on the chops and crumble two fried sage leaves over the top of each chop.

* You can create a vegetarian entree by spooning the relish over grilled mushrooms--preferably grilled oyster or porcini mushrooms (a portobello would work, but I feel as if the portobello is completely overused as a vegetarian entree option).  
​
                                                Works Cited
 
"AICR's Foods That Fight Cancer." AICR All. American Institute for Cancer Research, 4 Dec. 2012. Web. 23 May 2016.
 
Zuckerbrot, Tanya. "Fill Up On Cherries." Prevention. Prevention Magazine, 19   July 2013. Web. 23 May 2016.
0 Comments

Shaved Asparagus, Charred Strawberry, Pistachio, Lemon Vinaigrette 

4/30/2016

1 Comment

 
Picture
Picture
Picture
​
Shaved Asparagus, Charred Strawberry, Pistachio, Lemon Vinaigrette
Serves 4
 
            Imagine a salad that sings with ingredients that bridge spring to summer: the still yielding young asparagus spears tangle with sweet and mouth-watering charred strawberries, the crunch of pistachios, and tart piquancy of lemon vinaigrette. The charred strawberries are a treat: on their own, they are a flavor bomb that will send you into a yum yum dance, but in this salad they act as a soft contrast to the asparagus’ watery snap and lemon vinaigrette’s bright sharpness.
            This salad is best prepared with produce you purchase on the morning or afternoon before serving—the asparagus and strawberries need to be at the peak of ripeness. If you have to prepare the ingredients a few hours ahead of time, that is fine: simply make the vinaigrette, shave the asparagus and place a damp (not soaked) paper towel over the top, char the strawberries and lay them out on a plate (don’t put them on top of each other—once they are grilled, if you aren’t careful with them they will get mushy), and hold these ingredients in the refrigerator until you are ready to serve the salad.
 
3/4 pound young asparagus spears, washed, hard ends removed (should yield 3 cups of shaved asparagus, or 6 ounces per person)
6 medium size strawberries, washed and dried
½ cup roasted pistachios
 
Vinaigrette:
3 tablespoons lemon juice
4 tablespoons, 1 teaspoon extra virgin olive oil (the exact amount depends on how acidic the lemon juice is)
1 tablespoon, lemon zest
salt, to taste
 
1. Preheat the grill so that it is at medium heat.
 
2. Prepare the vinaigrette base: place the lemon juice, zest, and a pinch of salt in a glass jar. Let the ingredients mix for about 10 minutes while you prepare the asparagus and strawberries.
 
3. Grill the strawberries: wash and dry the berries. Rub an oiled rag over the grill grates, and place the strawberries on the grates at an angle. Grill the strawberries for about 7-9 minutes, turning them every few minutes so that they cook evenly on all sides.
 
4. While the strawberries cook, finish the vinaigrette by adding the olive oil and another pinch of salt. Close the lid. Vigorously shake the jar until the vinaigrette is emulsified. *You may need to add more olive oil or lemon juice, as lemons vary in their acidity. Aim for a clear acidic kick to the vinaigrette.
 
5. When the strawberries are done, set them aside to cool.
 
6. Wash the asparagus and snap off the hard ends. Dry the spears, and then one by one shave them on a bias with a Beriner or mandolin into paper-thin slices. If you don’t have Beriner or mandolin, simply use a sharp chef’s knife to cut the spears. Aim for 3 cups of shaved spears.
 
7. Remove the strawberry stems with a knife, and cut each strawberry into quarters.
​
8. In a stainless steel bowl, place the asparagus spears, a pinch of salt, and ¾ of the vinaigrette (shake it just before drizzling it in). Toss the spears in the vinaigrette and salt, check for seasoning, and add another drizzle or sprinkle as necessary.
 
9. Place about 6 ounces of the shaved and dressed asparagus on each plate. Spread the asparagus in level circle over each plate, and evenly distribute about 6 charred strawberry quarters and a few pistachios on salad. Sprinkle a small amount of salt on the strawberry quarters, as necessary and desired, and serve.
1 Comment

Grilled Sea Scallops with Asparagus, Lemon, and Mint Relish

4/9/2016

1 Comment

 
Picture
Picture
(Serves 4 as an appetizer) 

In early spring, delicate, shiny green spears push from the rain-drenched earth in an attempt to reach the sun, only to get cut down by the farmer’s knife. This ritual, while tragic for the young asparagus, is a welcome sign of spring in the Central Valley of California. What better way to celebrate the ritual harvest than to highlight the tender spear's mild flavor by pairing it with scallops, a light lemon dressing, and touch of mint. These spring flavors don’t compete but compliment each other.
            Asparagus contains high levels of glutathione, which according to the National Cancer Institute, “acts as an antioxidant, a free radical scavenger and a detoxifying agent” (Forberg; NCI). In other words, we should eat as much asparagus as we can for the short period in which it is locally available. While most asparagus recipes feature the vegetable as a side dish or salad, the asparagus, lemon, and mint relish shines a new light on this spring staple and allows us to enjoy its unique texture and flavor. 
           
1-pound of sea scallops
3 skewers, soaked in cold water
 
For the relish:
1 teaspoon lemon zest
½ teaspoon crushed garlic
1 tablespoon lemon juice
2 tablespoons extra virgin olive oil (plus 2 tablespoons olive oil for grilling the scallops)
5 spears of asparagus (remove the hard ends)
Salt, to taste
To finish: ½ tablespoon finely chopped mint
 
1. Put a small pot of water on the stove (about two quarts of water) and bring it up to a boil.
2. Get the grill hot. Turn the flame up to medium-high.
3. Rinse, dry the scallops, and put four each on each skewer.
4. Start to prepare the relish base as the grill heats: put the lemon zest, a pinch of salt, crushed garlic, and lemon juice in a small glass jar. Let the lemon juice macerate the garlic while you cook the asparagus and scallops.
5. Add one tablespoon of salt to the water and blanch the asparagus spears in the boiling water for 2 minutes. To stop the spears from cooking, shock them in a bowl of lightly salted ice water as soon as you pull them from the hot water. Promptly remove the spears from the ice water as soon as they have cooled down completely.
6. Thinly slice the asparagus spears lengthwise, and then small dice them. Set the small-diced asparagus aside.
7. Add the extra virgin olive oil to the glass jar and shake it vigorously to mix the ingredients together.
8. The grill should be hot now. Rub a lightly oiled rag over the grates.
9. Lightly salt the scallops and immediately throw them on the grill. Cook the scallops for just 1-1.25 minute on each side, gently turning them over with a fish spatula. Once they are cooked, place them on a plate to rest.
10. In a small, nonreactive bowl mix the asparagus with the lemon vinaigrette.
11. Remove the skewers from the scallops and immediately spoon the relish over them. Garnish with a ½ tablespoon of finely chopped fresh mint.
 
                                                 Works Cited
 
Forberg, Cheryl, R.D. "5 Powerful Health Benefits of Asparagus You Probably Didn’t Know." Eating Well. 23 Mar. 2016. Web. 9 Apr. 2016.
 
"Glutathione." National Cancer Institute Drug Dictionary. National Cancer Institute at the National Institutes of Health, n.d. Web. 9 Apr. 2016.
1 Comment

Grilled Early Spring Vegetables with Avocado-Orange Sauce

3/20/2016

0 Comments

 
Picture
Picture
Serves 4-5
 
The delicate vegetables and greens of early spring contain sublime flavors that should not be overpowered but simply brought to their fullness. Grilling the vegetables allows them to retain their unique characteristics. The dance of sweet, acid, and bitter and the tangle of crunch, snap, and melt set this dish apart. Go to your farmers’ market to pick up soil-kissed beets, baby onions, radishes and just plucked snap peas, escarole, and radicchio.
            Easy to make, bright, smooth, and luscious, the avocado-orange sauce lightly coats the caramelized veggies. This rich, fatty sauce balances with the vegetables’ leanness. In addition to adding another layer of flavor and texture to the dish, avocados contain healthy mono-saturated fats that may help lower LDL cholesterol levels, and oranges contain citrus limoniods, which help prevent numerous cancers (Sung; USDA). 
 
6-7 small or medium beets, roasted, peeled, and cut in halves, depending on size
1 bunch baby red onions, peeled and washed
½ pound snap peas, washed and deveined
1 bunch long scarlet radishes, washed and cut in half if large
½ head of escarole (avoid the bitter, thick leaves old escarole)
½ head of Treviso radicchio (or another radicchio)
 
Avocado-Orange Sauce:
1 Navel orange, zest and juice (about ¼ cup of juice)
2 avocados
1 garlic clove, crushed
½-1 teaspoon champagne vinegar
¼ teaspoon red pepper flakes
1 tablespoon olive oil
sea salt, to taste
 
1. Preheat the oven to 360 degrees Fahrenheit.
2. Wash and place the beets in a baking dish. Add a tablespoon of oil, ½ cup of water, and a pinch of salt. Cover the top of the dish with parchment paper and aluminum foil. 
3. Cook the beets for about an hour, or until they are just cooked through.
4. Allow the beets to cool, and then pull the skins off with your hands (use gloves if the red stain bothers you; always wash your hands first!)
5. Wash and prepare the other ingredients while the beets are cooling.
6. Prepare the sauce: crush the garlic and let it macerate in the orange juice for about 20 minutes, then place all of the ingredients in the food processor and process until smooth. Check the sauce for salt and acidity—it may be necessary to add a splash of champagne vinegar to kick up the acidity.
7. Heat the grill to medium-low.
8. Rub the grates with an oiled rag.
9. Lightly drizzle a few drops of olive oil on the veggies and salt them.
10. Cook the radishes, beets, and onions for about 6-7 minutes; cook the snap peas for about 3 minutes; and cook the radicchio and escarole for 2 minutes.
13. Arrange the vegetables on a serving platter or individual plates, and carefully spoon the avocado-orange sauce over them.
           
                                               Works Cited
 
Sung, Evan. "Ask Well: Are Avocados Good for You?" New York Times, n.d. Web. 12 Mar. 2016.

USDA / Agricultural Research Service. "Health Benefits Of Citrus Limonoids Explored." ScienceDaily. ScienceDaily, 9 April 2005.

0 Comments

Grass-fed Skirt Steak with Maitake, Castelvetrano, and Green Garlic Relish

3/12/2016

2 Comments

 
Picture
Picture
Serves 3 (roughly 5 ounce portions)
 
            The miracle of food always hits me this time of year: from what appears to be lifeless soil, spring vegetables push forth into the sun. Roaming the farmers’ markets, the produce seems to hang close to the soft, rain-drenched earth from which it emerges. Beets, radishes, sweet peas, spring onions, baby leeks, green garlic, and mushrooms—these delicate gems should be handled with care in order to bring out their earthiness.
            Maitake, commonly known as “hen of the woods,” contain L-glutamate, which ignites the fifth sense and makes our tongues sing as it engages our taste receptors (Stamets). Complimented by fresh green garlic’s mild tang and Castelvetrano olives’ buttery crisp, the maitake in this relish shine against thin slices of skirt steak.
            This recipe represents my approach to cooking: you should be able to indulge in the most delicious food while eating in a way that nourishes you. Recent cancer studies have shown maitake’s antitumor effects and immune building properties. According to the Memorial Sloan Kettering Cancer Center, maitake contain Beta 1,6-glucan and MZF, polysaccharides that help deter cancer tumor formation and increase antitumor response.
 
For the marinade:
1 pound of skirt steak
½ spring rosemary, washed and removed from the stem
1-2 cloves garlic, thinly sliced
¼ cup red wine
1-2 tablespoons extra virgin olive oil
salt and pepper, to taste as you grill the steak
 
For the relish:
¼ cup green garlic, small diced
1/8 teaspoon red pepper
1 tablespoon extra virgin olive oil
¼ pound fresh maitake mushrooms, torn into 1-inch pieces
¼ cup Castelvetrano olives, chopped
1/8 teaspoon black pepper, ground
1 teaspoon Balsamic vinegar, to cool the pan after sautéing the mushrooms and garlic
salt, to taste
 
1. Allow the steak to marinate for 5-6 hours.
2. Pull the meat from the marinade and place it on a plate. Season it with salt and pepper.
3. While the grill heats up to medium-high heat, prepare the relish.*
4. Rub an oiled rag over the grill grates, and place the steak at on angle on the grill.
5. Grill the steak for about 5-7 minutes on each side, turning the meat often to ensure even cooking. The cooking time will depend on how thick the steak is. Aim for medium-rare.
6. Pull the steak from the grill, place it on a plate, and create a tent around it with aluminum foil. Allow the steak to rest for 8-10 minutes before you slice it.   
7. Thinly slice the steak against the grain at an angle (cut on the bias).
8. Tangle the thin slices of skirt steak on a plate and spoon the maitake, Castelvetrano, and green garlic relish onto the slices. Sprinkle a little sea salt over the meat. You may want to drizzle a few drops of extra virgin olive oil on the skirt steak as well.
 
Maitake, Castelvetrano, and Green Garlic Relish:
 
1. Heat a sauté pan to medium-high heat. Once the pan is hot, place a tablespoon of oil in the pan, quickly swirl it around, and add the torn maitake pieces. With a spatula, move the maitake pieces around the pan while they cook.
2. Once the maitake are wilted (which should take about 1 minute), turn the heat down to medium-low and after about 2-3 minutes of cooking, add the diced green garlic and red pepper. Add salt to taste and cook the green garlic until it is soft and just cooked through (it should not brown).
3. Deglaze the pan with the teaspoon of Balsamic vinegar
4. Add the Castelvetrano olives and black pepper.
5. Taste the relish, and adjust for salt and acidity as necessary.
 
                                             Works Cited
 
"Maitake." Maitake. Memorial Sloan Kettering Cancer Center, n.d. Web. 12 Mar. 2016.
 
Stamets, Paul. "Maitake: The Magnificent 'Dancing' Mushroom." The Huffington    Post. TheHuffingtonPost.com, n.d. Web. 12 Mar. 2016.
2 Comments

​Grilled Lemon, Serrano, & Oregano Spiced Polpettine with ​Meyer Lemon Aioli

1/30/2016

1 Comment

 
Picture
Picture
Serves 5-6 as an appetizer, 3-4 as an entree
 
            In these flavorful little meatballs the slight heat of Serrano gets lifted by the acidic tang of lemon zest and tempered by the herbaceous kick of oregano. Polpettine are small versions of polpettone, Italian meatloaf filled with savory stuffing. Due to their size, polettine cannot be stuffed, but the ground meat is spiked with spices and aromatics.
            These bright and slightly spicy polpettine are the grilled appetizer for a backyard party, but you will also delight guests with these grilled meat treats at an indoor fall or winter cocktail party. Other options are to serve five polpettine together as an entrée or smashed into a meatball sandwich.
            Ground chicken thigh meat will retain more moisture than ground breast meat. While I prefer the delicate flavor of ground chicken with this recipe, ground pork or turkey thigh meat will pair well with the lemon zest, Serrano, and oregano.
            Serve the polettine with fresh Meyer lemon aioli (recipe below). If you don’t like anchovy, you can simply leave out the ¼ teaspoon of anchovy paste.
 
1 pound ground chicken thighs
1 tablespoon lemon zest, finely chopped
1½-2 teaspoons Serrano pepper (or a similar hot pepper), finely chopped
1 tablespoon fresh oregano, chopped
¼ cup red onion, small diced and 1/2 tablespoon olive oil to cook the onion in)
1 egg yolk
½ teaspoon salt
¼ teaspoon ground black pepper
 
If serving as an appetizer: 18 wooden skewers
 
1. Slowly cook the diced red onion in 1/2 tablespoon of olive oil and a pinch of salt. When it is cooked through, set aside to cool.
2. Place the oregano, lemon zest, finely chopped Serrano, ground black pepper, salt, and cooled red onion in a stainless steel bowl.
3. Add the pound of ground chicken thigh meat and 1 egg yolk*. Mix the ingredients together so that they are evenly distributed.
4. Use a stainless steel tablespoon to measure out the meat for the balls. Each ball should be roughly one overflowing tablespoon.  
5. Form the balls by hand, and place them on an oiled sheet tray. If they feel too loose, place them in the freezer for 20-30 minutes to set.
6. Rub an oiled rag over the grill grates.
7. Cook the Polpettine for about 7-8 minutes total, rolling them around on the grill so that they cook evenly.
8. When they are just cooked through, remove the polpettine and, if you are serving them as an appetizer, place each on the end of wooden skewer and serve with the aioli of your choice.
 
*If the meat is very moist (the meat varies in moisture), avoid the yolk—it most likely will not be necessary. You can place one polpettine on a pan and place it in the oven to see if it holds together without the egg yolk. If it does hold together, you are good to go, if it does not, then use the yolk.

​Meyer Lemon Aioli
 
1 egg yolk
2 tablespoons Meyer lemon juice
1 medium garlic clove, minced
1 cup extra virgin olive oil
salt, to taste
crack of black pepper
Optional, but recommended: ¼ teaspoon anchovy paste
 
1. Place the egg yolk, Meyer lemon juice, minced garlic clove, crack of black pepper, and a pinch of salt in a food processor.
2. Briefly blend the ingredients until they form an emulsion, then slowly drizzle in the extra virgin olive oil with the processor on. Start by adding the oil drop by drop as the processor blade turns. Once 40% of the oil is emulsified, you can speed up the rate at which you add the oil, but don’t go too fast or the mixture will break.
3. When all of the oil is emulsified, check the mixture for salt and acidity. Add salt as necessary. If you need more acidity, just add another splash of the lemon juice.
4. If you are up for it, add the anchovy paste and mix it into the aioli.
5. Serve with the polpettine. You can prepare the sauce a day ahead of time—if you do prepare it ahead of time, store it in the refrigerator and take it out about 40 minutes before serving to bring it up to room temperature.
1 Comment

Wild Salmon, Leek, and Olive Burgers

1/6/2016

1 Comment

 
Picture
Picture
Picture
Wild Salmon, Leek, and Olive Burgers
Serves 4
 
            This recipe accentuates rather than diminishes the delicate buttery flesh of wild king salmon. By pairing the salmon with lightly sautéed leeks, lemon zest, Dijon, and olives’ slight brine, the distinct but mild flavor of the salmon is brought out. While most fish burgers or cakes use breadcrumbs as binding, this ingredient just dilutes the fish’s real flavor and adds no nutritional or culinary value. The key to a complex texture and flavor profile is to process half of the amount of salmon in the recipe with aromatic seasonings and a small amount of almond flour. Medium dice the rest of the salmon and fold it in with the smooth base while adding finely chopped dill, olives, and leeks. This method results in a tender, juicy, and scrumptious burger.
            Each wild salmon, leek, and olive burger contains roughly 30 grams of protein (Oaklander 1). By lightly grilling the patty, you can create a protein-packed meal without the harmful fats created through frying or sautéing. In addition, wild salmon contains a significant amount of the healthy omega-3 fatty acids, as well high levels of selenium, magnesium, and phosphorus (Kerns 1).  
            While I am generally against freezing fish because it does impact the texture, if you have a busy life these burgers can be made ahead of time, frozen, and then defrosted and grilled for an easy weeknight dinner—just be sure to drain the burgers of any excess moisture before grilling.
 
1.5 pounds wild king salmon
1 tablespoon lemon zest, chopped
½ cup almond meal, finely ground
1 tablespoon Kalamata or Castelvetrano olives, rinsed and finely chopped
½ cup leeks, small diced and rinsed
3 tablespoons extra virgin olive oil (2 for the salmon mixture, 1 for sautéing the leeks)
2 teaspoons Dijon mustard
1 tablespoon fresh dill, finely chopped
1.5 teaspoons salt
 
1. Clean the salmon of any skin, and gently rinse the flesh under cold water. Allow the salmon to dry, and cut half of it, or ¾ pound, into large cubes. Place the cubes in a food processor with the lemon zest, almond meal, salt, two tablespoons of olive oil, and mustard. Process until just smooth.
 
2. Scrape the salmon mixture into a stainless steel bowl and set aside in the refrigerator.
 
3. Prepare the leeks by gently sautéing them in olive oil. Do not allow the leeks to brown—they key is to just cook them through. Once they are cooked, set the leeks aside to cool.
 
4. Slice the remaining salmon into 1/2-inch slices, and then dice the slices so that you have ½ inch diced pieces of salmon.
 
5. Take the salmon mixture out of the refrigerator and add the diced salmon, finely chopped dill and olives, and cooked leeks. Gently fold the ingredients together so that they are evenly mixed.
 
6. Form the salmon burgers. Aim for four burgers and a thickness of 1.5 inches for each burger.
 
8. Place the burgers in the freezer for about 25-30 minutes so that they set and become firm (you don’t want to completely freeze the burgers but just stiffen them).
 
9. Preheat the grill to medium-high heat.
 
10. Brush the grill grates with a rag that is damp with olive oil.
 
11. Place the burgers on the grill and allow them to cook for about 3-4 minutes on each side. Do not over cook the burgers—you still want a little pinkness in the center—aim for medium doneness.
 
12. Pull the burgers from the grill and immediately serve with a generous dollop of fresh Lemon-Basil Aioli (the aioli recipe is at the end of this recipe: http://www.gabriellemyers.com/gluten-and-dairy-free-recipe-blog/-cornmeal-crusted-black-bean-zucchini-cakes-with-lemon-basil-aioli), Romesco sauce (see the second picture—recipe to come in summer 2020!), or Parsley and Olive Sauce (http://www.gabriellemyers.com/parsley-and-olive-sauce.html).
 
                                                    Works Cited
 
Kerns, Michelle. "The Health Benefits of Alaskan Salmon." SF Gate n.d.: 1. Web. 5 Jan. 2016.
Oaklander, Mandy. "Should I Eat Salmon?" Time (2015): 1. Ebscohost. Web. 5 Jan. 2016.
1 Comment

Grilled Butternut Squash with Walnuts and Pomegranates 

12/22/2015

1 Comment

 
Picture
Picture
Picture
Serves 4
           
            Most butternut squash recipes call for roasting and then pureeing the squash for soup or as a side dish. This recipe uses the grill to caramelize the squash’s sweet flesh while sealing in its moisture. With each bite, the delicate char on the outside of a grilled piece gives way to a creamy inside.
            Butternut in itself contains high levels of the carotenoids lutein and zeaxanthin, manganese, and vitamin C (Busch), and when paired with the tangy antioxidant punch of pomegranates, the combination creates a superfood power dish.
            While this recipe is best executed right before serving, the butternut can be grilled ahead of time and then finished in the oven as you prepare to serve the meal.  
 
1 peeled butternut squash, cut into 1-inch thick squares (see the picture)
¼ cup pomegranate seeds
¼ cup walnuts, roasted and chopped
1 crushed garlic clove
1 tablespoon balsamic vinegar
2 tablespoons extra virgin olive oil
 
1. Preheat the grill to medium-high heat or get the coals burning. Preheat the oven to 400 degrees Fahrenheit.
 
2. Wash, peel, and cut the squash into 1-inch square slices. At the bulb, deseed and then do your best to cut the squash into even slices that match the other slices.
 
3. Toss the squash in a light coating of olive oil and season with salt.
 
4. Grill the squash by placing it at an angle on the grates and cooking it for 3 minutes before setting it straight across the grates for another 3 minutes. Flip the squash over, and continue this process to cook the other side. Aim for about 6-7 minutes for each side.
 
5. Test the squash to see if it is cooked. A fork should slide through the squash slices, but they should still be reasonably firm. If the squash still needs to cook, finish it in oven for another 6-10 minutes.
 
6. While the squash cooks, prepare the other ingredients. Make the vinaigrette by crushing the garlic clove and immersing it in the vinegar. Let the garlic macerate in the vinegar for about 6 minutes, then whisk in the olive oil and finish with salt. Chop the roasted walnuts, deseed the pomegranate, and place them in separate bowls.
 
7. When the squash is cooked, remove it from the oven and place it on a serving plate. Put the walnuts and pomegranates on top of the squash. Drizzle the balsamic olive oil over the other ingredients and serve.
 
                                                   Works Cited
 
Busch, Sandi. "Butternut Squash Health Benefits." SFGate. n.d. Web. 22 Dec. 2015.
1 Comment

Pasture-Raised Pork Chops Slathered with Fennel, Sage, Lemon, Garlic

12/6/2015

0 Comments

 
Picture
Picture
Dairy and gluten free
Serves 4
 
            This recipe uses thick, bone-in pork chops slathered with a bright and tangy mix of lemon, sage, fennel seed, garlic, and hot pepper.  The savory coating creates a slightly acidic and spicy balance to the pasture-raised pork. Bone-in pork chops generally have more intense flavor and remain juicy if properly cooked. With pork chops, you have to be careful not to overcook the meat: aim for a pink tinge in the center of each chop.
            While I developed this recipe so that you can easily prepare a quick mid-week meal without any fuss, if you have a little more time, quickly grill the chops, smooth the mixture over the top, and finish in the oven for about 5-7 minutes.
            Before serving, add a squeeze of fresh lemon and drizzle of extra virgin olive oil.
 
4 large pork chops, bone in (about 1½ inch thick)
1 tablespoon fresh sage, chopped
1 tablespoon garlic, crushed
1 teaspoon hot pepper flakes
1 teaspoon fennel seed, toasted and ground
1 tablespoon lemon zest
2 tablespoons olive oil
salt and pepper, to taste
 
1. Preheat the oven to 400 degrees Fahrenheit.
2. Rinse and dry the chops.
3. Gently toast and grind the fennel seeds.
4. Peel and crush the garlic.
5. Wash and zest the lemon.
6. Wash and chop the fresh sage.
7. Place the olive oil, lemon zest, red pepper, fennel seed, sage, and garlic in a small bowl and mix until all of the ingredients are evenly distributed to form a small paste.
8. Put the chops in a roasting pan, drizzle a little olive oil on them, and season with salt and pepper on both sides.
9. With a small spoon, evenly spread the herby lemon spice mixture over the topside of the chop.
10. Place the chops in the oven, and bake for about 8-12 minutes on each side, depending on the thickness. Pork chops are best when they are still slightly pink and juicy in the center. When you turn the chops over after 8-12 minutes, be gentle so that the paste holds to the chops.
11. Let the chops rest for about 5 minutes, and then serve with a squeeze of fresh lemon and a drizzle of extra virgin olive oil. 
0 Comments

Lemon, Sage, Honey Infused Chicken Breasts

11/14/2015

 
Picture
Picture
Dairy and Gluten Free
 
Serves 6
 
            Chicken breasts infused with a spiced lemon, sage, and honey brine retain their tender juiciness as the aromatics release during roasting. By cutting the breasts in half length-wise, the fragrant yet mild brine penetrates the meat without over powering its natural flavor.
            Since a significant amount of the packaged meats that many of us use for sandwiches and salads contain nitrates or preservatives, I developed this recipe to help maintain a healthy diet throughout busy workweeks. Even the uncured organic sliced meats still contain natural preservatives, and I question the health benefits of meat cooked weeks ago that can stay ‘fresh’ in a package of plastic for over a month. This recipe takes only a little preparation and almost no time to cook, and the resulting juicy sandwich-sized cooked breasts are worth the time.
 
2 tablespoons lemon zest, chopped
2 tablespoons fresh sage, chopped
1 tablespoon honey
1 teaspoon red pepper flakes
1 tablespoon salt
¼ teaspoon fennel seeds, gently toasted
¼ teaspoon black pepper
2 cups cool filtered water
3 chicken breasts (boneless, skinless), cut in half length-wise
1-2 tablespoons olive oil
 
1. Prepare the chopped lemon and sage, and place these ingredients in a gallon-sized plastic bag or large stainless steel bowl with the honey, red pepper flakes, fennel seeds, salt, and black pepper. 
 
2. Prepare the chicken breasts by placing them on a cutting board and cutting the breasts in half lengthwise, so that you have six breasts halves.
 
3. Place the breasts in the bag or bowl with the spices and seasonings, and turn them around in the container to distribute the ingredients.
 
4. Add the cool filtered water to the mix and close the bag. Shake the bag until all of the ingredients are evenly distributed. If you are using a bowl, mix the chicken and brine with a spoon until all is distributed.
 
5. Place the chicken in a refrigerator for 48-72 hours.
 
6. Preheat the oven to 400 degrees Fahrenheit. Oil a large roasting dish with a generous amount of olive oil.
 
7. Pull the breasts from the bag or bowl, shake off the brine, and place them in the roasting dish. Add salt and pepper to taste before placing the chicken in the oven.
 
8. Roast the breasts for 12-15 minutes, or until they are just cooked through. The breasts will cook quickly, so it is important to check them often after the first 10 minutes of cooking. The flesh will be slightly pink because of the brine. Pull the breasts from the oven when they are still tender and just cooked through, with no rare pink flesh.
 
9. If you want to use them for sandwiches or salads throughout the week, allow the breasts to cool before you put them in the refrigerator. If you plan on consuming them immediately, garnish with a little fresh parsley, lemon juice and zest, olive oil, red pepper flakes, and serve.

Variations:
                        For meatless twist, try this brine with 1-inch slabs of tofu. The brining and cooking time for the tofu and chicken are the same, but I recommend adding another teaspoon each of salt, pepper flakes, and sage. Be sure to season the tofu with salt and pepper before you place it in the oven.
                        Instead of roasting the chicken breasts, try grilling them. Preheat the grill to medium-high, dry the breasts with a towel, oil the grates, and place the breasts at an angle on the grill. After 5-7 minutes, flip the breasts over so that they cook on the other side for another 5-7 minutes (I recommend not trying to crosshatch the grill marks—you most likely will overcook the breasts). Once the breasts are just cooked through, serve as specified in the final step.

Basil, Zucchini, & Pistachio Pesto

10/26/2015

0 Comments

 
Picture
​Dairy and Gluten Free
Serves 4-6, depending on how the pesto is served
 
The end of October signals the shift from summer to fall, from zucchini to acorn squash, from strawberries to pomegranates, from fragile basil to sturdy rosemary. As cooks who thrive off of seasonal ingredients, this time of year becomes a study in bounty, when we can walk into gardens and see the last of the summer squash, peppers, and tomatoes breathing their final exhale as pumpkins begin to ripen and apples loaded with flesh fall to the ground.
            With this recipe, basil leaves toughened by summer heat and the gaining chill of October mornings are harvested and processed with roasted pistachio, lemon zest, crushed garlic, and gently roasted zucchini.
 
1¼ cup zucchini, small diced and roasted
1¼ cup roasted pistachios, finely chopped
2 cups basil leaves, thinly sliced
¼ lemon zest, about 3 lemons
3 cloves of garlic, crushed
1¼ cups extra virgin olive oil 
Salt, to taste
A squeeze of lemon juice, to taste
 
1. Preheat the oven to 350 degrees Fahrenheit.
 
2. Wash and dice the zucchini, toss it in a drizzle of olive oil, and a pinch each of salt, black pepper, and red pepper flakes.
 
3. Roast the zucchini for about 12-15 minutes or until it’s just done (it should still be firm).
 
4. While the zucchini is roasting, prep the other ingredients.
 
5. Wash and zest the lemons. Chop the lemon zest.
 
6. Peel and crush the garlic cloves.
 
7. Place the pistachios in a food processor and process them until they are finely chopped (not too roughly chopped and not paste-like, but so small bits of the nuts are still visible). Put the chopped pistachios in a stainless steal bowl.
 
8. Take the zucchini out of the oven to cool.
 
9. Wash and dry the basil leaves, and put them in the food processor with the olive oil. Process the basil until smooth.  
 
10. Once the zucchini is cooled, place all of the ingredients into the bowl (lemon zest, crushed garlic, pistachios, pureed basil, zucchini, salt). Let the ingredients mingle for about 30 minutes before serving.
 
11. Right before serving the pesto, squeeze a little fresh lemon juice into the mixture, stir it well, and check for proper seasoning (you may need to add a little more salt). 
0 Comments

Hive-Mind is out! 

10/2/2015

1 Comment

 
Purchase a copy or two on Amazon:
http://www.amazon.com/Hive-Mind-Gabrielle-Myers/dp/0976498693/ref=la_B015YDWL9A_1_1_title_1_pap?s=books&ie=UTF8&qid=1443838672&sr=1-1
Picture
1 Comment
<<Previous
Forward>>

    Author l

    Gabrielle Myers

    RSS Feed

    RSS Feed

    Archives

    September 2020
    July 2020
    May 2020
    March 2020
    February 2020
    December 2019
    November 2019
    October 2019
    August 2019
    July 2019
    June 2019
    April 2019
    February 2019
    January 2019
    November 2018
    October 2018
    August 2018
    July 2018
    June 2018
    May 2018
    April 2018
    March 2018
    January 2018
    December 2017
    November 2017
    September 2017
    August 2017
    June 2017
    May 2017
    April 2017
    March 2017
    February 2017
    December 2016
    November 2016
    October 2016
    September 2016
    August 2016
    July 2016
    May 2016
    April 2016
    March 2016
    January 2016
    December 2015
    November 2015
    October 2015
    September 2015
    August 2015
    July 2015
    June 2015
    May 2015
    November 2014
    October 2014
    July 2014

    Categories

    All

    RSS Feed

Proudly powered by Weebly
Photos used under Creative Commons from quinn.anya, ConstantinWied