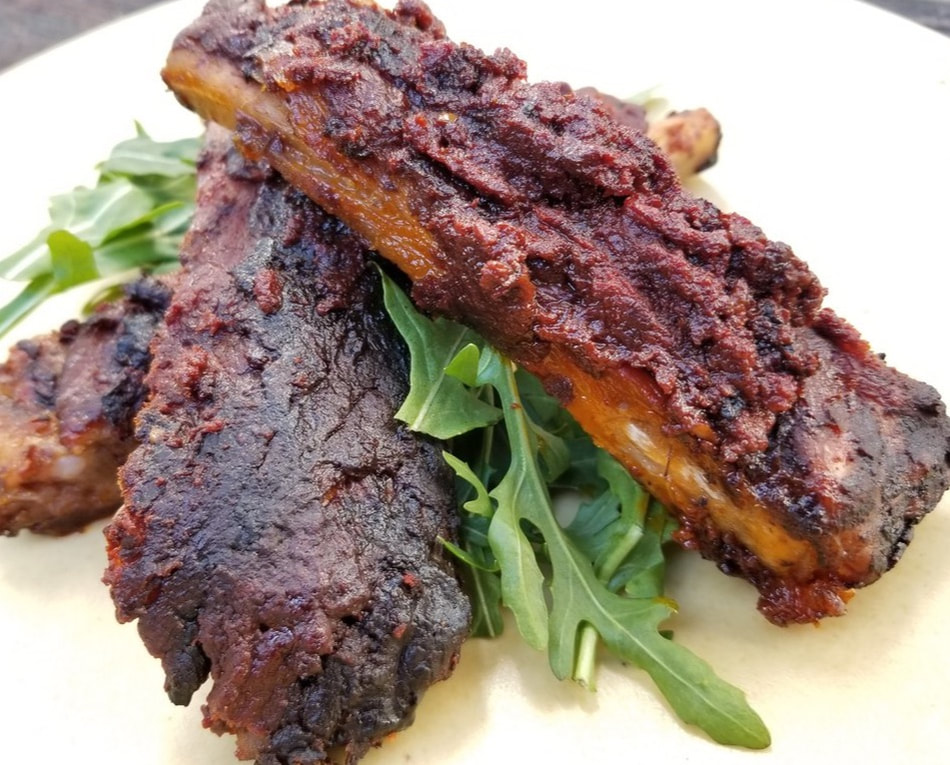
Gabrielle Myers Writer, Chef, and Teacher
  • Home
  • About Me
  • Too Many Seeds, A New Poetry Collection
  • Hive-Mind, a memoir
  • Farm to Fork Column Articles in Inside Sacramento
  • Photographs for Sale
  • YouTube Channel
  • Gluten and Dairy Free Recipe Blog
  • "A Sensory Journey," Learn About My Farm-to-Fork and Writing Journey
  • Video Poem "Lidded," from Too Many Seeds
  • "Live as the Tomatillo Reaches for Life on a Hot July Day," in Edible East Bay, Fall 2022
  • Two Poems in Edible East Bay, Spring 2022
  • A Review of Too Many Seeds!
  • Interview on Too Many Seeds on The Spark with Stephanie James
  • A Review of Too Many Seeds, Tweetspeak Poetry
  • "Food for Thought," a Q & A on Too Many Seeds
  • October Farm-to-Fork Column: Good Eats for All: There's Nothing Elitist About Farm-to-Fork Nutrition
  • "Dried Bits," in Borderlands, Texas Poetry Review
  • "Vessels" and "Lost Amantes Saltan" in pacificREVIEW, Spring 2020
  • Farm to Fork Column: December 2023: Lots of Potential
  • Farm to Fork, Inside Sacramento, November 2022: "Color It Delicious"
  • Video Poem: On Ayako's Pa Amb Tomaquet
  • Video Poem: Quality Control
  • A Review of Hive-Mind and a Recipe
  • Farm-to-Fork Column: "Well Oiled," March 2022
  • Farm-to-Fork Column, April 2022: "Mission Filled," on Judith Redmond of Fully Belly Farm
  • Farm-to-Fork Column: Inside Sacramento, Feb. 2022
  • Interview on Dr. Andy's Poetry and Technology Hour!
  • An Interview on Too Many Seeds, Author2Author
  • Farm-to-Fork Column, Inside Sacramento, "Sweet Nectar," September
  • Farm-to-Fork Column, June: Mighty Mights: How Organic Farmers Capitalize on Bugs' Life
  • An Interview on Too Many Seeds, BITEradiome
  • Video Poem: Sonnet #69
  • A Video Reading from Hive-Mind
  • Video: On Poetry and Cooking
  • An Interview on Shirleymaclaine.com
  • Selection from Hive-Mind
  • Selection from Hive-Mind
  • "Early Fall's Failed Elegy," in Catamaran, Summer 2018
  • After Grass Against Sea, by Edward Weston, in Catamaran Fall 2020
  • "For Girls Who Walk Alone to the Bus Stop," in Connecticut River Review, Fall 2018
  • "Lover" & "We're There and Here," in Koan, Paragon Press, Summer 2018
  • "Fall," in The Adirondack Review
  • "The First Rain of Fall," in Fourteen Hills, 2010
  • The Art of Tomato Breeding
  • An Interview with Wendy from WINA in Charlottesville
  • Paul Canales: Building Community
  • Interview on Intuitive Ink Radio Show
  • Eat with Health in Mind
  • On Radio MD
  • An Interview with Allison Dunne from 51%
  • An Interview
  • “AN OCTOROON”: A DARING COMEDY ON SLAVERY, AT BERKELEY REP
  • An Interview with Robert Sharpe of BITEradio.me
  • Amazon Author Page
  • How to Use Your Daily Commute to Flourish
  • Raspberry, Almond, and Quinoa Bars
  • "Sonnet #69" in MadHat Lit
  • "I Am a Figure of Speech," Wallace Stevens Journal, Spring 2015
  • Spinach Salad with Spiced Chicken, Currents, Pistachios, Lemon Vinaigrette
  • Lemon White Bean Puree
  • ‘Spread Like a Veil Upon a Rock’: Septimus and the Trench Poets of World War I in English
  • "Lament for My Sister at Harvest" in Damselfly Press
  • "Woman," "Pleasant Valley," and "Laura" in the Solitary Plover
  • Parsley and Olive Sauce
  • "Prom Night" in Work Literary Magazine
  • The New Prostate Cancer Nutrition Book
  • "To Bukowski" in The Evergreen Review
  • YouTube Video of "The First Rain of Fall" (published in Fourteen Hills, Fall 2009)
  • YouTube Video of "Sonnet #69"
  • YouTube Video of "Bird"
  • YouTube Video of "Last Night in the Castro"
  • Linktree Page
  • Contact

Bacon-Wrapped Pork Loin Stuffed with Asparagus, Fennel, and Green Garlic

4/6/2019

0 Comments

 
Picture
Picture
(Serves 4-5)
​
             Sing in the bounty of spring with tender pork laced with smoke and the sublime kick of fresh asparagus and green garlic. This dish takes ingredients traditionally saved for a sauce or side dish and incorporates them into the meat’s center in order to infuse the pork with their flavors and act as a double-tenderizer. 
 
            The spring’s flavor proliferation creates a chorus that can drown us in peas, radishes, fennel bulbs, mint sprigs, fresh onion tops and citrus still bearing, but if we step back and think carefully, we can select the right pairings that will enable each ingredient to sing its own note while mingling graciously with just a few other ingredients. 
 
            Fennel is often associated with pork because its sweet anise-like aroma accentuates the pork’s mild sweetness. Pair fennel with tender, mild asparagus and the zing and snap of green garlic, and you will have a dynamic threesome that will leave your mouth whistling and your throat humming. 
 
            Pork tenderloin and chops tend to be lean cuts, and they almost always benefit from brining 12-24 hours before cooking. While some chefs opt to heat and then cool their brines, I prefer the mild and deep flavor base that cool brine ushers forth. 
 
            If you cannot find green garlic at your local store, you can sub out with green onion or garlic cloves. While fennel seed is dramatically different from fennel bulb, if you cannot locate the bulb, try to mix in ½ teaspoon of ground fennel to the asparagus/garlic mix. 
 
            The recipe below is divided into four main process steps that you can either prepare in one day or a few days ahead of time if you have a heavy schedule (no more than 2 days ahead of time). 
 
Brine (prepare about 12-24 hours ahead of time—24 hours is best, but if you only have 12 hours for the brine, that will do):
 
2 pork tenderloins (pasture-raised, about 1 pound each)
4 cups of cool water (use filtered water if you have it; if you do not have a filter, just use cool tap water)
1 garlic clove, crushed and roughly chopped
1 tablespoon lemon zest
1 teaspoon red pepper flakes 
¼ teaspoon crushed black pepper
1 tablespoon fresh sage, torn or roughly chopped
1 tablespoon sea salt 
 
1. Place all of the items above in a container large enough to hold the brine and two tenderloins (I like to use a large glass food storage container). 
 
2. Wash the pork in cool water and put it in the brine. Make sure that the brine covers the pork. If not, try a deeper container or place a small plate on top of the meat to weigh it down. 
 
3. Cover the container and put the brining meat in the refrigerator for about 20-24 hours. 
 
Prepare the pork stuffing:
 
½ cup green garlic, roughly chopped 
½ cup fennel bulb, small diced 
1 cup asparagus, small diced, or sliced to match the fennel’s small dice 
1 teaspoon lemon zest
1 tablespoon extra virgin olive oil
½ teaspoon red pepper flakes 
salt, about ¼ teaspoon or to taste 
a sprinkle or two grinds of fresh black pepper 
 
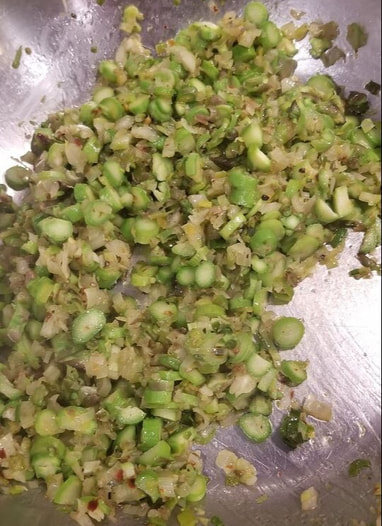
1. Place the olive oil, green garlic, and fennel in a medium fry pan with the salt and red and black pepper. Slowly heat the mixture up until it sizzles and cook it for about 3-4 minutes. 
 
2. After the mixture just starts to become tender and slightly cooked, add in the asparagus and lemon zest, and cook for another 2-3 minutes. Do not overcook the asparagus or other vegetables—you want them al dente because they will continue to cook a little bit as you cook the tenderloins. 
 
3. Once the vegetables are al dente, pull the pan from the heat and set the mixture aside to cool. 
 
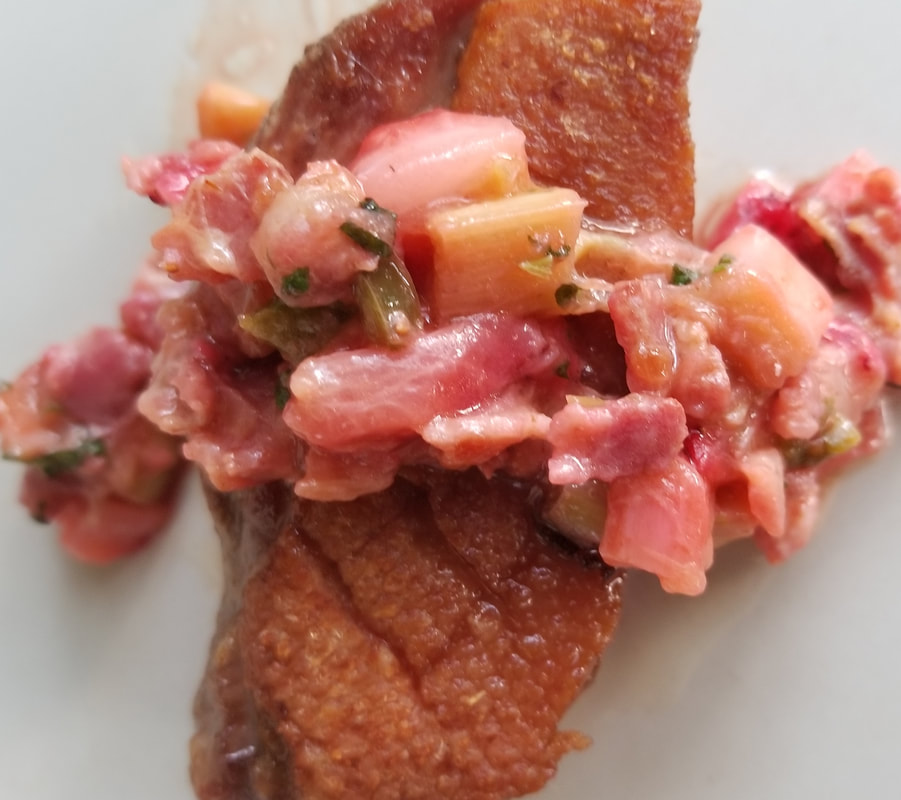
Wrapped and stuff the tenderloins:
 
About 12, 10”strings of butchers twine 
1 pound uncured bacon 
 
1. Take the loins out of the brine and place them on a plate covered in paper towels. Let the loins dry as you prepare the string and bacon. 
 
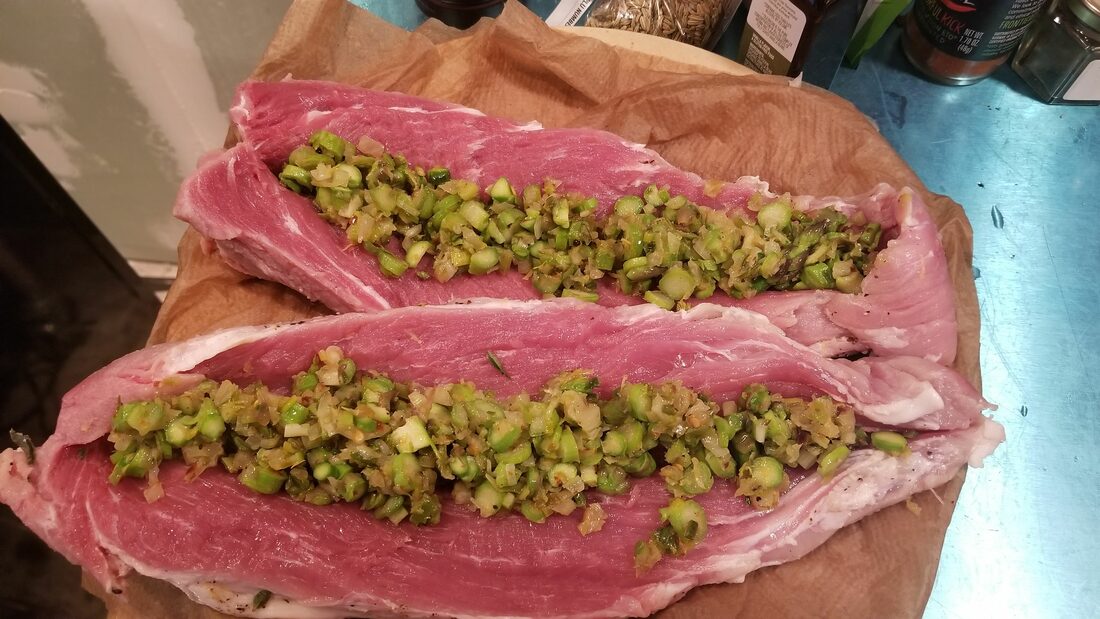
2. Once the loins have drained for about five minutes, cut each loin in half length-wise to open the loins up but not cut straight through them (about ¼-1/2 inch of flesh should be left intact so that you can close up the stuffing in the loins). 
 
3. On a sheet tray or large plate, place 6 slices of bacon (you might need more slices or fewer slices; aim for the number of slices that will cover the size of the pork loins). 
 
4. Place the loins on top of the bacon slices, so that the open sides of the loins face up. Spoon the asparagus-fennel-garlic mixture inside each loin in thick lines—you should use most of the mixture, but do not overstuff the loins or the stuffing might fall out. 
 
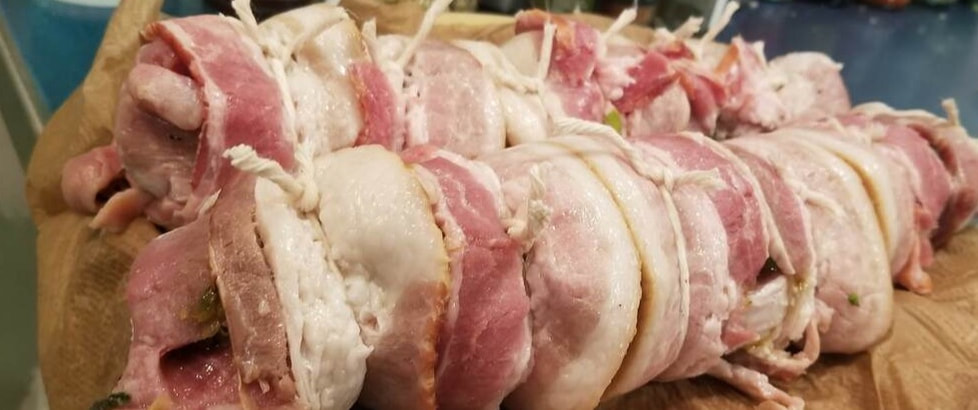
5. Carefully roll the loins around the bacon slices so that the stuffing and openings are sealed. 
 
6. Tie the butchers’twine around the middle of the bacon slices that wrap around the loins. If you have extra string hanging out of the meat, trim it with scissors. 
 
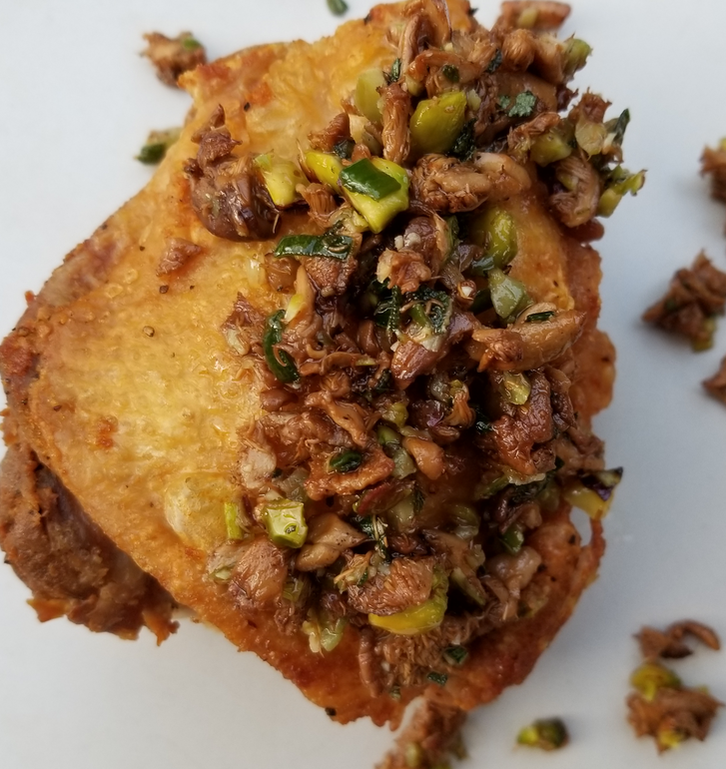
Cook the tenderloins: 
 
For this step you will need 1 tablespoon olive oil or grape seed oil
 
 
1. Pre-heat an oven to 375 degrees Fahrenheit 
 
2. Heat a large fry pan up to medium, add in the oil, swirl it around, and gently place the loins in the pan. 
 
3. Cook the loins on medium heat and turn them occasionally until each side browns. Once the bacon is brown, place the pork in the oven. How long you cook the loins will depend on their thickness and your desired doneness. I prefer medium-well pork loin, and generally that takes 9-12 minutes to achieve. If you like pork more well done, cook it for 12-15 minutes. 
 
4. Once the pork is cooked, take it out of the oven and pan, and allow it to rest for 8-10 minutes. 
 
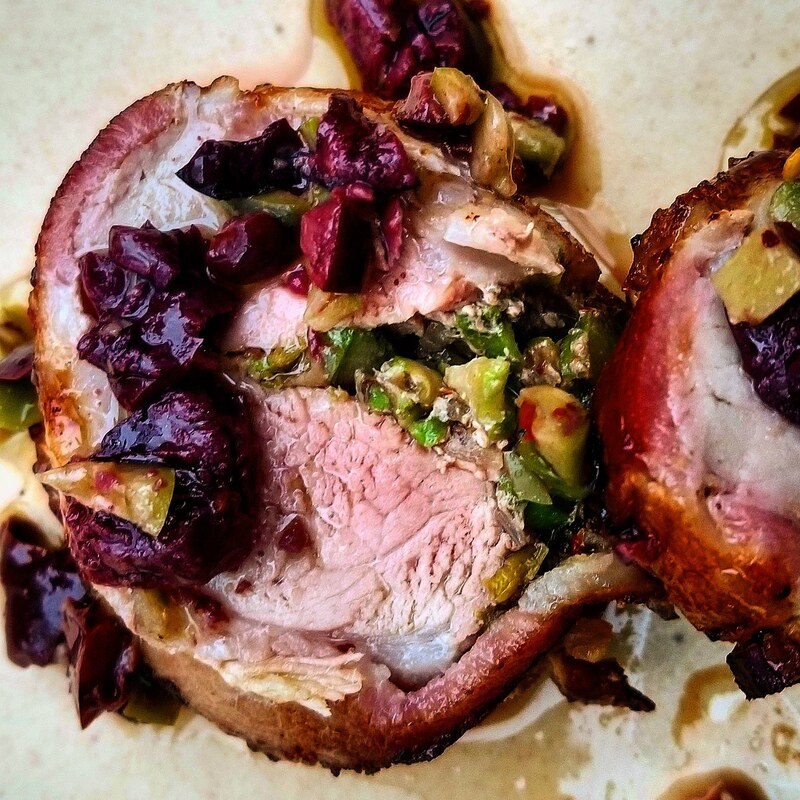
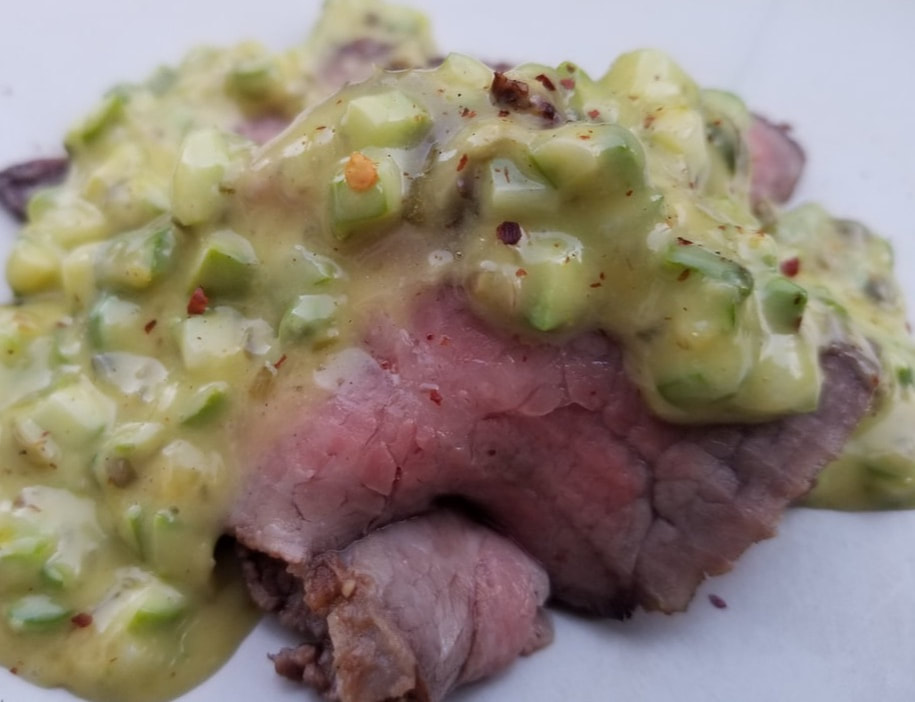
5. Once the pork has rested, place it on a cutting board, and cut it in 1-inch slices. Cut the strings carefully with your knife and pull them from the bacon without ripping the bacon away from the loins. 
 
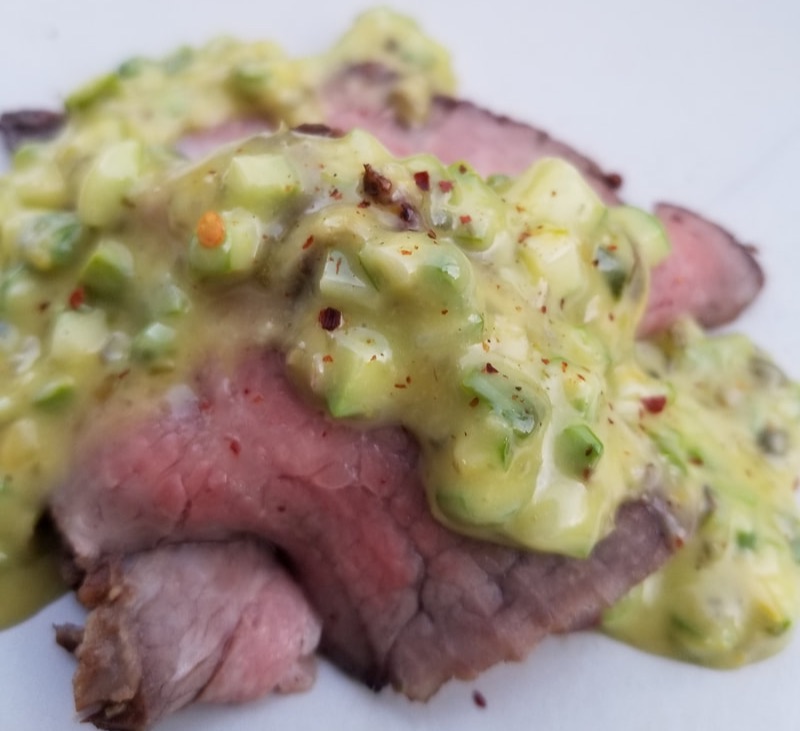
6. Place the tenderloin slices on a platter or on individual plates, and serve with a spoonful or two of olive tapenade or salsa verde.* 
        

Picture
Picture
Picture
0 Comments

​Savory Potato Cakes with Smoky Paprika

2/8/2019

0 Comments

 
Picture
Picture
(This recipe makes seven to eight cakes, which will serve four people as a generous side dish, eight as an hour d'oeuvre)
            One aspect of being creative in the kitchen that I love involves taking a recipe from one culture and using it to inspire a recipe that improves on a common dish from another culture. When I first started playing with the following recipe, I tried to make thin poppadum-like disks that had Spanish seasonings. I wanted a crunchy, airy texture to dip into sauces. The Indian cookbook that had been sitting on my shelves in various places for the last ten years finally got a read through when I just needed to relax and not do any hard thinking over my winter break. I was also lounging on the couch for hours watching a YouTube channel that featured a chef cooking on a farm in India who crafted delicious savory cakes and fried items. Indian cuisine inspired me to think of all of the savory, pan-fried items I could craft without wheat-based flour. Lentil and chickpea flours and potatoes are the basic ingredients of non-wheat-based savory carbohydrate treats in India. I had never heard of using potatoes before, and the idea intrigued me. 
            I followed a recipe in which you cook potatoes, mash them, roll them out into paper-thin disks, and dry them for 55-72 hours. To add a Spanish twist, I added smoky paprika and cayenne. When fried though, these disks were hard, and as my brave boyfriend said tasted “like potato jerky.” Clearly, this was not what I had been aiming for. 
            I tried about four variations of this recipe to finally land on the proper drying time and thickness for the cakes. Twelve to thirteen hours of drying time allow the potato flavor to come forward while still remaining tender as the cakes cook. You want a cake-like thickness, similar to a thick pancake. This thickness will allow for the insides to remain moist and warm like mash potatoes when you fry them, while the outsides get crispy golden brown. You can enjoy the potato cakes for breakfast with eggs, or as an appetizer or side dish at dinner. Feel free to play with the seasonings—try adding a little chopped and sautéed green garlic or minced fresh garlic in the potato mix. 
 
1 pound russet potatoes, medium/large in size (about three)
1 teaspoon sea salt
¼ teaspoon smoky paprika 
1/8 teaspoon cayenne
¼ teaspoon cracked black pepper
Pinch of baking powder
2-3 tablespoons olive oil
 
1. Place the potatoes in cool filtered salted water and bring them to a soft boil. Cook the potatoes until they are just done, and pull them out of the water to cool for 3 minutes. 

2. Place the potatoes in a small pot or bowl, and gently crush them with a flat spatula or fork. Sprinkle in the dry seasonings, including the baking powder, and carefully mix the potatoes until they form a slightly chunky mashed potato consistency. Be sure evenly incorporate the dry ingredients into the potatoes.  

4. Divide the potato dough into seven-eight portions. 

5. Place a sheet of parchment paper on a sheet tray, and coat the parchment with a little olive oil.

6. Form a small ball from each portion, and push each ball out with your palms and fingers in order to form a small round cake. After you form each cake, carefully lift it with a broad spatula from one of your hands and place it on the oiled parchment/wax paper. 

7. Set the tray of potato cakes in an airy, dry place in your kitchen or home (I placed my cakes in front of an air purifier so that they received a constant stream of fresh air). The goal is to dry out the cakes over the course of 12-13 hours. Using a spatula, you should flip the cakes over after 6-8 hours of initial drying.
 
8. Heat a large fry pan up to medium-high heat. Place the olive oil in the pan, swirl the hot oil around the pan, and immediately place the cakes in the oil. Shallow fry the cakes on each side until golden brown, and lift them from the pan onto a paper towel.

​9. Let the oil drain briefly onto a paper towel, and then serve the cakes by placing them on a platter. Garnish with chopped chives or fresh torn basil. 
Picture
0 Comments

Caramelized Onion Chickpea Cakes

1/21/2019

1 Comment

 
Picture
Picture
(Makes 12-14 cakes. Serve a single cake as an hors d’oeuvre or two-three for an appetizer.) 
            One of the hardest aspects and a health bonus of the gluten and diary free diet rests in the inability to eat most pancakes savory and sweet, fritters, donuts, fried food, pizza, etc. While others are tempted to catch breakfast on the run or grab a pizza or fried chicken at a fast food joint on the way home, you stick with mostly proteins and vegetables. That said, when you have a craving for one of these carb-loaded treats, you can either search out an over-priced gluten and dairy free bakery or make these savory cakes at home. The latter option is usually more practical for your pocketbook and convenience. 
            By eating these cakes, you will experience joy at what seems like a sinful eating experience while filling your belly with the complex carbohydrate of chickpea flour. The addition of fresh sage, caramelized onions, and a hint of smoky paprika will leave your taste buds humming and not missing a bite of the wheat and diary free treats mentioned above. 
            You can caramelize the onions for this recipe in advance, and then whip up the batter and cook the cakes in a few minutes for a rustic or elegant dinner side. Another option would be to cook up two cakes and add whatever sandwich fixings you prefer to have a delicious and healthy lunch on the go. 
 
2 cups of chickpea flour
1 1/2 cup of water, room temperature 
½ teaspoon sea salt
1 tablespoon extra virgin olive oil (1 tablespoon mixed into the batter)
2 tablespoons safflower oil
1 teaspoon fresh sage, chopped 
1 teaspoon smoky paprika
1 onion, small diced, caramelized (small dice one yellow onion, and slowly cook it in 1 tablespoon of olive oil until it is browned. Be sure to stir it as it cooks so that you will have even browning.)
 
1. Put the water, salt, olive oil, paprika, caramelized onions, and chopped sage in a mixing bowl and slowly stir in the chickpea flour. 
 
2. Once the mixture is smooth with no lumps, set it aside to let the flavors blend, which should take about 30-45 minutes. 
 
3. After the flavors have been allowed to come together, slowly heat up a large fry pan with the safflower oil. You want the pan and oil to get hot enough to gently fry the cakes, but watch out to not let the oil get so hot that it will smoke. Aim for just enough oil to gently shallow fry the cakes. 
 
4. Take a large spoon (just a regular dinning spoon) and ladle the mixture into the pan. Depending on the size of your pan, you may be able to fit three to four cakes at once. Fry the cakes until they are golden brown and then flip them over. Cook them on the other side until golden brown as well. While you fry the remaining cakes, let the first few batches rest on paper towel on a warm plate, but do not lay the cakes on top of one another or cover them, which will ruin the crispy texture and cause them to steam. 
 
5. Serve the cakes stand-alone, add a dollop of cashew cheese or cream cheese, or use them as sandwich “bread.”
1 Comment

Ume Plum with Pink Lady Apple and Cranberry: A Thanksgiving Sauce

11/21/2018

0 Comments

 
Picture
Picture
 Serves 4-5 ​
           Ume Plum Sauce with Pink Lady Apple and Cranberry is a tribute to my dear friend and long-time cooking buddy Ayako Iino. I’ve cooked side-by-side with Ayako at San Francisco Bay Area catering companies and restaurants such as Oliveto, Boulette’s Larder, and the Metropolitan Club. A master Japanese chef with pickled Napa cabbage, marinated squid, and plum blossoms in her veins, Ayako’s sensitivity and awareness of each ingredient’s potential allows her to consistently create not just new dishes but a whole line of Ume plum treats. 
       One of the best memories of my life so far was helping Ayako move her sundried Ume plums from drying racks into buckets of shiso infused syrup. On a valley-warm, late summer day when the dryness seeped into corn stalks and withering roadside chicories, I worked under Ayako’s direction. Amid fields of eggplant, tomato, and sunflower at Capay Valley’s Full Belly Farm, we worked with the heating sun, walking from the fruit drying rack area to the new barn. Full Belly is one of the most productive and authentic small organic farms in the world, and the network of farmers and the abundance of river water and its sediment make Capay Valley one of the most productive agricultural areas in the world. The care that Ayako took with each plum reminded me of how at Oliveto she would attentively pull each thread of fingerling potato skin so as not to injure the potato and rip off any of its flesh. In the small Capay, you are sided by large rolling hills, pine, oak, and the bounty of numerous small organic farms. The ripe tomato resin and broken dried hay smell filled the valley air as we moved under the late summer sun. 
          Ayako’s Ume plum business has since taken off, and in addition to winning Good Food awards in SF, she has tented out her business to sell not only online at https://yumeboshiplum.com but at Berkeley Bowl, The Local Butcher Shop, Bi-Rite, Farmshop, Dimes Deli, and the Oakville Grocery (and more places—see her website).
            The dance of Ume plum, Pink Lady apple, cranberry, and sublime Shiso syrup creates a sweet, salty, acidic drama that will entangle a crispy duck or chicken breast in its flavor clutches. If you are sick of cranberry sauce and its variations, try something new this Thanksgiving with this quick and easy sauce. Including prep time, this play on the traditional Thanksgiving sauce will take under 15 minutes to make. Ume Plum Sauce can be paired with turkey, duck, chicken, or pork as well as roasted cauliflower, or you could enjoy it mixed into an arugula salad with roasted almonds (and blue cheese if you can take it) for some vegetarian love. 
 
4 Ume Plums, torn into small pieces
1 Pink Lady apple, small diced
¼ cup cranberries
¼ teaspoon jalapeno, finely chopped
¼ teaspoon mustard seed
1 tablespoon red shiso syrup 
2 teaspoons olive oil 
Salt, to taste 
 
1. Place the olive oil in a small sauté pan and turn the heat on medium-high. 
2. Add in the torn Ume, cranberry, diced apple, mustard seed, and salt and cook the mixture for about four minutes.
3. Add in the chopped jalapeno and cook for another minute or two. 
4. Turn the heat off and add in the red shiso syrup. 
5. Check the sauce for balance and seasoning, and serve with roasted duck, turkey, chicken, or pork.
0 Comments

​Dairy and Gluten-Free Fried Chicken Tenders

10/19/2018

0 Comments

 
Picture
Picture
Picture
Serves 3-4 entrée portions 
 
            Let’s be honest: nothing has a fried food’s crunch and depth of flavor. For many years I have had to abstain from most fried foods because they are usually soaked in buttermilk or cream and then coated with gluten packed breadcrumbs or flour.  At first this was a painful and frustrating abstinence, but as the years went on and the cravings were confronted, I learned to live without the sweet crunch of fried calamari or the tender give and crunchy tenderness of fried chicken and fish. 
            Sometimes in life we need to indulge in comfort foods that are just enjoyed for their shear pleasure and ignore the potential health consequences so that we are here and now with the experience of life at that point in time. That said, there are healthy oils and ways of preparing our fried food that matter and can make the difference between a slightly indulgent meal and an all out “I don’t give a shit about my body fest.”The oil you use matters, and I recommend you use organic oils, preferably sunflower and grape seed.  If you coat your chicken in healthy and aromatic almond flour, then you also mitigate the vacuous health desert land of most flours that are used to fry with. Besides, what can be more indulgently beautiful than enjoying the crispiness of a chicken tender, feeling the steam rise from your mouth to your nose, and only needing to gently chew on the tenderness of a perfectly cooked piece of breast. 
 
1.3-1.5 pounds of organic chicken tenders 
 
Almond Meal Mixture
2.5 cups almond meal
1 tsp. teaspoon smoky paprika 
½ teaspoon ground black pepper
¼ teaspoon ground sage
½ teaspoon salt, and to taste
¼ tsp. red pepper flakes, crushed
 
Aromatic Egg Wash 
1 egg
1 tablespoon almond milk
1 tablespoon mustard
1 teaspoon apple cider vinegar
½ teaspoon smoky paprika 
pinch of salt
-Wisk all of these ingredients together 
 
For frying: Organic sunflower oil or grape seed oil (enough to submerge the chicken tenders— approximately 16 ounces)
 
1. Rinse and dry the chicken fingers and slowly begin to heat the oil on medium heat. 
 
2. Place the chicken in the aromatic egg wash while you mix the dry ingredients. 
 
3. Roll the chicken in the almond meal mixture until evenly coated and set aside on a dry plate.
 
4. Check the oil for heat—after about 5-7 minutes on medium heat the oil should be hot enough so that if you throw in a kernel of batter into the oil it will float to the top as a sizzling buoy. Of course, you could also use a thermometer and aim for 375 degrees Fahrenheit.  
 
5. If the oil needs to heat, continue to let it, but if it is ready for the chicken, carefully float the chicken tenders in the hot oil. 
 
6. Cook the tenders for 7-9 minutes in the hot oil. Be sure to turn then after about 4 minutes of cooking so that they evenly brown.
 
7. When you pull the tenders from the oil, place them on a few layers of either parchment paper or brown paper towels to rest and let the excess grease drain away. This should take about 7-8 minutes (if you can, I recommend avoiding bleached paper towels or parchment paper due to the possible health concerns). 
 
8. Place the tenders on a plate and garnish with fresh chopped chive, basil, or parsley. Dip the tenders in the Meyer Lemon Aioli or Salsa Verde from The Blog at this site or try dipping them in a mustard sauce loosened with extra virgin olive oil. 

0 Comments

Sungold Basil Sauce

8/23/2018

0 Comments

 
Picture
Picture
Serves 5-6
 
            This easy to make and versatile sauce will leave your guests in ecstatic appreciation of summer’s bounty. The sun’s essence gets accentuated through Sun Gold cherry tomato gems. Ripe Sun Golds have the ideal balance of sweetness to acidity and a full flavor profile that will leave you slapping your knee with mouthwatering goodness.
            If you cannot find Sun Golds, for this recipe you can use any ripe cherry tomato. If the resulting sauce lacks an acidic kick, feel free to add a few drops of red wine vinegar to kick up the acidity. Since the olive oil plays such a dominate role in this sauce, be sure to select high quality extra virgin olive oil.
            This sauce works well on a variety of fish, meats, and other proteins: spoon it over grilled lamb chops, use it as a dip for gluten-free fried chicken or tofu, or drizzle it over pan-roasted salmon. This sauce even works well as a salad dressing.
 
Ingredients:
¾ pound, Sun Gold tomatoes
1/3 cup fresh basil leaves
3 ounces cup extra virgin olive oil
1 medium clove of garlic, sliced
¼ teaspoon chopped Serrano pepper
salt, to taste
 
1. Wash and dry the Sun Golds, the Serrano, and the basil leaves.
2. Roughly chop the Serrano pepper and slice the garlic clove.
3. Place all of the ingredients in a blender.
4. Pulse the ingredients until a smooth sauce develops, which should take about 2 minutes.
5. Serve the sauce over grilled lamb chops, salmon, or chicken.

0 Comments

Yukon Gold Potato Salad with Aioli, Pickle, and Jalapeno

8/2/2018

0 Comments

 
Picture
Picture
​Serves 4-5 as a side dish
 
            Most foods we eat at BBQ and grill parties have the potential to be healthy and sinful all at the same time; the key to unlocking the common ground in these seemingly opposite tokens of the food coin rests in the base ingredients and sauces. As I mentioned in the last post, homemade aioli not only tastes better than store bought mayo, it’s easy to make and you probably already have its ingredients in your pantry and refrigerator.
            This easy to make potato salad presents a healthy and more flavorful version of the classic summer favorite. Potato salads come in a wide range of different styles, but often the potatoes are drowning in mass produced RoundUp Ready Canola or soy oil and taste bland, with maybe a drizzle of mustard or some chopped bacon to spice them up. This recipe combines the tang and kick of dill pickles and jalapeno with the earthy smoke of paprika, all set against the bed of a smooth, antioxidant rich aioli and mustard sauce. 
 
½ cup small diced dill pickles
1 tablespoon finely chopped jalapeno 
5-6 medium Yukon Gold potatoes 
1 tablespoon Dijon mustard
¼ teaspoon smoky paprika 
½ cup homemade aioli* (see the recipe below)
Salt and pepper, to taste 
 
1. Place the potatoes in a pot of salted, cool water.
2. Cover the pot and place the potatoes on the stove. Turn the heat up to medium-high.
3. When the water comes to a boil, remove the lid, and turn the heat down so that the water is at a low boil. 
4. Cook the potatoes for about 30-35 minutes, or until they just give to a steak knife. 
5. Pull the potatoes from the water, and set them aside to cool. 
6. While the potatoes are cooking or cooling, make the aioli and prep the other ingredients.*
7. Once the potatoes have cooled and you can work with them, place them on a cutting board and cut them into large diced pieces. 
8. Place the potato pieces, diced dill pickles, finely chopped jalapeno, mustard, paprika and aioli in a stainless steel bowl and evenly mix the ingredients. 
9. Set aside the potato salad to let the ingredients mingle for about 45 minutes. If it is a hot day or you need to wait longer to serve the dish, put the salad in the refrigerator and take it out about 15-20 minutes before you serve it. 
 
*Homemade Aioli:
 
1 large egg yolk
1 tablespoon lemon juice, and to taste
1 tablespoon lemon zest
1 cup extra virgin olive oil
salt, to taste
 
1. Place the egg yolk, lemon juice, lemon zest, and a pinch of salt in a food processor. 
2. Briefly blend the ingredients until they form an emulsion, and then slowlydrizzle in the extra virgin olive oil with the processor on. Start by adding the oil drop by drop as the processor blade turns. Once 40% of the oil is emulsified, you can speed up the rate at which you add the oil, but don’t go too fast or the mixture will break. 
3. When all of the oil is emulsified, check the sauce for salt and acidity. Add salt as necessary. If you need more acidity, add another splash of lemon juice. 
4. Set the sauce aside. You can prepare the sauce a day ahead of time—if you do prepare it ahead of time, store it in the refrigerator and take it out about 30 minutes before serving to bring it up to room temperature. Do not let it sit out of the refrigerator for more than an hour.
0 Comments

Coleslaw with Lemon Aioli and Smoky Paprika

7/24/2018

0 Comments

 
Picture
,            Serves 4-5 as a side dish
 
            While I love bacon-wrapped hot dogs and potato chips more than anyone, I know that these summertime party going food staples are not healthy for me. Coleslaw has the potential to be a super food, super party staple, but often it is drowning in mass produced mayonnaise that contains RoundUp Ready Canola or soy oil as a main ingredient and not much flavor to create any complexity or contrast. 
            Like most food that we buy pre-package and pre-made, mayonnaise or its more tasty and elegant partner, aioli, are easy sauces to make, and most people have base ingredients for these sauces easily accessible. When you make the coleslaw’s sauce yourself, you can control the quality of the ingredients, most importantly the quality of the oil. Aioli does take about 7-10 minutes to make, but the time gets shorter if you have practiced making it. Once you have it down, this is a versatile sauce that you can use for many backyard grill parties and whip up in no time. 
            Coleslaw’s main ingredient is cabbage, which hosts a wealth of health benefits. By slicing the cabbage, you release its anti-oxidant properties. Coleslaw contains a significant amount of insoluble fiber as well, making it the perfect companion to the bacon-wrapped hot dog because it will cleanly and efficiently send that cured meat through your system (smile). 
 
Coleslaw:
4 cups shredded green cabbage
1 tablespoon lemon juice
1 teaspoon salt, and to taste
1/3 cup homemade aioli* (see recipe below)
½ teaspoon red pepper flakes
½ teaspoon smoky paprika 
 
Homemade Aioli:
 
1 large egg yolk
1 tablespoon lemon juice, and to taste
1 tablespoon lemon zest
1 cup extra virgin olive oil
salt, to taste
 
1. Place the egg yolk, lemon juice, lemon zest, and a pinch of salt in a food processor. 
2. Briefly blend the ingredients until they form an emulsion, and then slowlydrizzle in the extra virgin olive oil with the processor on. Start by adding the oil drop by drop as the processor blade turns. Once 40% of the oil is emulsified, you can speed up the rate at which you add the oil, but don’t go too fast or the mixture will break.
3. When all of the oil is emulsified, check the sauce for salt and acidity. Add salt as necessary. If you need more acidity, just add another splash of lemon juice. 
4. Set the sauce aside. You can prepare the sauce a day ahead of time—if you do prepare it ahead of time, store it in the refrigerator and take it out about 30 minutes before serving to bring it up to room temperature. Do not let it sit out of the refrigerator for more than an hour. 
 
Slaw: 
1. Use a mandolin, thin slicer on your food processor, or a very sharp knife to thinly shred the cabbage. 
2. Place the cabbage in a stainless steel bowl, add in the lemon juice and salt, and stir it well to ensure that the ingredients are evenly distributed. 
3. Let the cabbage, salt, and juice mingle for an hour. 
4. About 30 minutes before serving the coleslaw, mix in the red pepper flakes
and smoky paprika, and stir all of the ingredients together.
5. Set the coleslaw aside until you are ready to serve it. If it is a hot day or you need to wait longer than an hour to serve the dish, put the slaw in the refrigerator until about 15-20 minutes before you are ready to serve it.  

0 Comments

Beef Short Ribs with a Fresh Cherry Tomato Marinade

7/11/2018

0 Comments

 
Picture
Serves 2-3 as an entrée
 
Most short rib recipes ask you to slowly braise ribs for hours in a flavorful braising liquid. While braising the ribs results in fork tender meat, you can enjoy the speed, taste, and convenience of grilling the ribs at your next backyard BBQ party. The ribs yield to the grill’s direct heat and become fork tender, and their meaty smack is intensified rather than diluted in braise. When you work a full-time job, it is hard to find 5-6 hours of oven time for dinner, but with this recipe you can throw the ribs in the marinade in the morning and then come back to grill them in the evening. 
 
            Purchase grass-fed short ribs with ample marbling, and then cut each rib in half from the top down. One side of each rib will be larger and hold the bone—cook those ribs for about 2-3 minutes longer than the boneless side. You can try this recipe with boneless ribs, but I think that when you can get bone in your meat, you should. The meat is more intense with the bone, and you have a little handle to dip the rib into your mouth with. 
 
Marinade:
            Dry ingredients: 
1 teaspoon red pepper flakes
½ teaspoon orange zest (if it is fresh, put the zest with the wet ingredients in the blender)
½ teaspoon black peppercorns 
½ teaspoon fennel seeds
 
1. Toast these ingredients in a small fry pan until slightly aromatic.
2. Let the spices cool for a few minutes before placing them in a spice grinder. 
3. Pulse the grinder until the spices are finely ground. 
 
            Wet ingredients:
1 tablespoon smoky paprika
1 tablespoon whole grain mustard
1 tablespoon capers, rinsed
2 tablespoons extra virgin olive oil 
½ cup cherry tomatoes, washed, stems removed 
3 medium garlic cloves 
2 pounds beef short ribs, cut in half (the bone will live with one half of the rib meat)
 
1. Place these ingredients in a blender or food processor. 
2. Pulse the blender until the ingredients emulsify.
3. Using a spatula, scoop out the marinade, place it in a bowl, and mix in the finely ground spices. Make sure that the ingredients are fully blended. 
4. Place the short ribs in a bowl or large glass container with the marinade, and distribute the marinade around the meat evenly. 
5. Cover the bowl or container, and place the ribs in the refrigerator to marinate for about 6 hours or longer. 
 
Grill the Ribs: 
1. Heat up the grill for about 20-25 minutes. 
2. Turn the heat to medium.
3. Pull the ribs from the marinade (Leave the marinade on and let it cling to the meat).
4. Rub a well-oiled rag over the grill grates and then put the ribs on the grill.
5. Grill the ribs for about 7-9 minutes on each side (the rib half with the bone might take a little longer). Do not move the ribs too much as they are grilling. 
6. Once cooked to only have a slight give to them (cooked to medium), pull the ribs from the grill and set them aside to rest. Lightly cover them with parchment as they rest. 
7. After about 10 minutes, the ribs are ready to serve. 
8. Place the ribs on a serving platter, and garnish the plate with a pinch of chopped parsley or basil. 
0 Comments

Remojon Granadino (or Chilled Rockfish Granada-Style with Orange and Olive): A Tapa

6/24/2018

0 Comments

 
Picture
Picture
​(Serves 4-5 as a tapas/appetizer)
 
            Situated on the edge of the Sierra Nevada and resting on a mountainous slope, Granada Spain’s charming cobblestone streets contain a varied mix of Spanish tapas joints, cafes, and Arab tea and smoke shops. Granada’s original cuisine reflects the diversity of Andalusia’s past and present. On one corner you can have a saffron-infused seafood paella complete with mussels, clams, langoustines, and cod, and on the next corner have a Moroccan tagine packed with slow-cook chicken and lemon. 
            Remojon Granadino speaks of this beautiful region’s culinary bounty and close proximity to the sea. I tried this dish on my first, and to date, only visit to Spain. In the din and body-elbowing crowd of a tapas joint, after ordering our drinks and a few tapas, this tapa was brought out as a free dish for my group of friends to try. Initially I thought of how odd this tapa looked and questioned what it was I was about to eat. But on the first bite the surprising mix of bright orange, briny olives, tender salted cod, and base nourishment of egg won me over and made me think twice about the assumptions I make about what might taste good in a dish. 
            I am a firm believer that you cannot just take a dish from one region and expect to make it the same way in another region and obtain similar results. Because of where I live in California the cod we get is not that fresh, so I used rockfish instead. I also added a hint of smoky paprika and a slight lift of lemon juice to up the flavors and give the dish a smoky, brighter edge. If you can get fresh cod, that is the traditional fish to use in Remojon Granadino, but a firm white fish from any region is a solid substitute. Combine the ingredients just before serving, with only an hour or less before you or your guests will enjoy it—it will not hold well because of the fish, egg, and acidity of the orange. 
 
2 Navel oranges, de-segmented 
¼ cup black olives, sliced
½ pound Rockfish or Cod                                                                              
½ yellow onion, sautéed slowly in extra virgin olive oil 
¼ cup olive oil
¼ teaspoon Smoky paprika 
2 eggs, medium-boiled, cut in half and then in slices  
 
1. In a medium-size fry pan, place the rockfish or cod in ¼ cup of olive oil. As the fish cooks, season it with salt on the open side. 
2. Turn the flame on medium-low, and slowly poach the fish in the oil until it is just done (be careful to not overcook the fish). Be sure to flip it over halfway through the process so that it cooks evenly on both sides. Once the fish is cooked, set it in the refrigerator to cool.
3. Place all of the other ingredients in a nonreactive dish or bowl. 
4. Once the rockfish is cool, gently break it into large pieces and place the pieces into the bowl or dish. Gently mix the ingredients, but not too much because the fish and egg will break down if over mixed. 
5. Check the dish for salt and acidity. If necessary, squeeze some lemon juice into the mixture or add more salt. 
6. Place the Remojon into the refrigerator to cool for about 20 minutes. 
7. Spoon Remojon onto small plates (include the juicy olive oil), garnish with a small amount of chopped fennel frond or parsley, and serve. 

Picture
0 Comments

Molasses Brined Spare Ribs with Chocolate, Smoked Paprika BBQ Sauce

5/20/2018

0 Comments

 
Picture
Picture
Serves 2  as an entree, 4 as an appetizer 

​Easy to make yet complex in flavor, this recipe joins molasses’ faint hint of sweetness and earthiness with the brightness of paprika and tomato. Brining the ribs in a flavorful bath of molasses, fennel, and lemon zest slowly tenderizes the meat before you begin the cooking process. By tenderizing the meat in brine, the ribs retain moisture and yield to your fork and teeth in a gentle, loving way. 
            Once you make BBQ sauce from scratch, you won’t want to go back to the pre-packaged, sweet, artificial ingredient-filled plastic bottle sauces. Most of this sauce’s ingredients might be in your pantry or refrigerator, and if not, with a quick trip to the local grocery you will be set up. If you cannot locate San Marzano tomato paste, just buy a generic organic tomato paste. 
            This recipe will more than satisfy your Memorial Day and early June BBQ partiers without stressing you out with a complicated setup. 
 
The Brine: 
 
2.5-3 pounds pasture-raised pork spare ribs
8 cups filtered water (room temperature)
1 tablespoon molasses 
1 teaspoon lemon zest
1 teaspoon ground fennel seed
1 teaspoon hot pepper flakes
1 tablespoon sea salt 
 
1. Whisk all of the ingredients but the pork together in a large stainless steel pot. 
2. Once mixed, add in the ribs, and put a small plate or bowl over the ribs so that all of the flesh is submerged in the liquid. 
3. Place the pot in the refrigerator. 
4. Brine the ribs for 3 hours. 
5. Pull the ribs from the brine, place them on a sheet tray covered in parchment paper, and sprinkle a little olive oil and salt on them. 
6. Roast the ribs for about 1.5 hours, and then pick up with step four below. 
 
Chocolate, Smoked Paprika BBQ Sauce:
 
1.5 ounces dark bittersweet chocolate
7 ounces organic San Marzano tomato paste
1 tablespoon Dijon mustard
1 teaspoon red wine vinegar
2 teaspoons smoky paprika
1 teaspoon garlic paste (make fresh)
Salt, to taste 
 
1. Preheat the oven to 315 degrees Fahrenheit. 
2. Melt the chocolate in a small saucepan on very low heat. 
3. Put the other ingredients in a stainless steel bowl. 
4. Mix in the melted chocolate with the other ingredients. Set aside at room temperature (away from the stove’s heat). 
5. After the ribs have cooked for 1.5 hours at 315 degrees Fahrenheit, lather the sauce on both sides of the ribs. 
6. Turn the ribs about every 30-40 minutes as they cook for another hour or hour and a half. Add more sauce to cover the ribs as necessary. Once they pull away from the bone, the ribs are done. 
0 Comments

​Duck Breasts with Spicy Strawberry, Rhubarb, and Bacon Sauce

5/1/2018

0 Comments

 
Picture
Serves 3-4 
            This dish was inspired by a dinner I had on a trip to Italy with my mom back in 2003. On one of my few trips outside of the US (so far!), we drove through the tall, snow-infiltrated Calabrian mountains to arrive at a small bed and breakfast run by two brothers. One brother was the chef, the other was the inn keeper and restaurant manager. The chef grilled a veal chop and topped it with the most surprising and mouth-watering sauce—a wild strawberry, green pepper, and mint sauce. The combination was like nothing I had ever tried before and left my mouth reeling with possibilities.
            Food memories are like that—ideas linger in your mind, only to play out in a recipe or dish 15 years later, this time clamoring with mid-spring California’s bounty and the backdrop of the Sierra’s snow-melting peaks.
            The duck breasts’ golden crunch contrasts with the sauce’s sweet tang and deep smoky lift. This is a dish to make now, before rhubarb disappears from gardens and grocery shelves. Rhubarb’s brightness is hard to match once it is out of season, but you can substitute rhubarb for Pink Lady or Fuji apple, or chop up a little Meyer lemon and mix it into the sauce if you cannot locate rhubarb.
 
½ cup uncured bacon, medium diced
2 teaspoons shallots, finely chopped
1 tablespoon Jalapeno, finely chopped
½ cup rhubarb, medium diced
¼ cup strawberries, medium diced
Pinch of chopped mint
Salt, to taste
 
1-1.5 pounds of duck breasts, deboned, skin on
 
Make the sauce:
1. Place the shallots and bacon in a medium-sized sauté pan.
2. Slowly cook the shallots and bacon on a low flame until the shallots are translucent and the bacon has released its fat.
3. Add in the rhubarb and Jalapeno, cook for 2 minutes, then add the diced strawberries, cook everything for two more minutes, and remove the pan from the heat. Do not overcook this sauce or it will be mushy.
4. Place the sauce in a nonreactive bowl and stir in the chopped mint right before serving.
5. Spoon the sauce over the duck breasts.
 
Cook the duck breasts:
1. Preheat the oven to 400 degrees Fahrenheit.
2. Pull the breasts from the marinade and wipe off any peel, pepper flakes, or thyme twigs that cling to the meat.
3. Place the breasts skin side up on paper towels. Wipe off any excess moisture on the skin.
4. Preheat a heavy-bottom fry pan on medium-high.
5. Score the skin of the breasts with a sharp knife in order to create a crosshatch pattern.
6. Season the breasts with salt and pepper.
7. Once the pan is hot, put the oil in the pan, swirl it around, and place the duck in the pan. Be sure to move the breasts around until they do not stick (don’t put too many breasts in the pan at once—if you have a medium-sized pan, cook the breasts in batches of two).
8. Turn the heat to medium-low. Cook the breasts for 8 minutes on the skin. Frequently turn the breast skin around in the pan to ensure even cooking.
9. Flip the breasts over and cook them on the flesh for another minute.
10. Turn the duck back over so that the skin side faces down and place it in the oven to cook for another 6-8 minutes. Aim for medium-rare. The exact oven cooking time will vary depending on the size of the breasts.
11. Pull the breasts from the pan and place them on a plate. Loosely tent them with aluminum foil as they rest for 5 minutes.
12. After the breasts have rested, place them on a cutting board and thinly slice the meat across the grain.
13. Place the sliced breast on a plate or platter and spoon the sauce over the top of the skin. Serve immediately.
 

0 Comments

Roasted Spare Ribs with a Simple BBQ Sauce

4/14/2018

0 Comments

 
Picture
​The late spring BBQ season comes with a rush as cherry trees flush with fruit and tall grasses tangle against our ankles. Rather than rely on additive and sugar-packed store bought BBQ sauces, follow this recipe to make your own savory sauce. Ridiculously easy to make, BBQ sauce should accentuate the fattiness of the falling off the bone rib meat. Instead of the odd and likely chemically processed liquid smoke, use naturally smoked paprika to give the sauce a smoky kick. The lycopene in the tomato paste and the Manganese and Magnesium rich molasses make this sauce leap with health benefits.  
 
Rub for the ribs:
1 teaspoon hot red pepper flakes
1 teaspoon ground fennel seed
½ teaspoon black pepper
Salt, to taste
 
BBQ Sauce:
7 ounces organic San Marzano tomato paste
2 tablespoons organic blackstrap molasses
1 tablespoon Dijon mustard
1 teaspoon red wine vinegar
2 teaspoons smoky paprika
½ teaspoon garlic paste (make fresh)
Salt, to taste
 
1. Put all the ingredients in a stainless steel bowl.
2. Mix the ingredients well.
3. After the ribs have cooked for 1.5 hours at 315 degrees Fahrenheit, lather the sauce on both sides of the ribs.
4. Turn the ribs about every 30-40 minutes as they cook for another hour or hour and half. Add more sauce to cover the ribs as necessary. Once they pull away from the bone, the ribs are done. If you like to grill, place the ribs on a low flame and gently grill them for about 10 minutes to finish cooking. 
0 Comments

Hedgehog Mushroom, Green Garlic, Pistachio Relish

3/12/2018

2 Comments

 
Picture
Picture
Hedgehog Mushroom, Green Garlic, Pistachio Relish
 
            This relish accentuates the wild Hedgehog mushroom’s delicate woodsy flavor with a backdrop of spicy green garlic and pistachio’s round buttery crunch. When wilted, the creamy yellow and orange ‘shroom turns brown as the flavor gets concentrated and the water in the flesh evaporates.
            Hedgehogs have a long growing season and are widely available for a wild mushroom. These fungal gems also contain high levels of vitamin D and selenium (Baldy).
            Spoon the relish over the crispy skin of pan-roasted chicken breasts or thighs, marinated tofu, or a juicy rib-eye steak. You can prepare this relish ahead of time and store it in the refrigerator, but don’t add in the chopped pistachio until right before serving—this will help retain its crunch.
 
1.5 cups, sliced Hedgehog mushrooms
1 tablespoon olive oil to cook the Hedgehogs
1 tablespoon, roasted and chopped pistachios
1 teaspoon, chopped sage
1 teaspoon chopped Castelvetrano olive
1 teaspoon finely chopped green garlic (or shallots)
¼ teaspoon Balsamic vinegar
1 tablespoon extra virgin olive oil to finish
Salt, to taste
 
1. Heat up a medium fry pan on high heat, add the olive oil, and throw in the sliced Hedgehogs.
2. Shake the pan and stir the Hedgehogs as they cook. They will lose their liquid and then start to brown. Once the liquid is released, turn the heat down to medium. Aim for a slight golden brown. This should take about 5 minutes.
3. Right before the Hedgehogs are done cooking, add in a pinch of salt and the green garlic (or shallots), cook them for 1-2 minutes, and then add in the chopped sage for a final minute of cooking.
4. Set the pan aside to cool.
5. Once the pan is cool, add in the Balsamic.
6. Right before serving, add in the chopped pistachios.
 
Baldy, Meagan. "Fall in Love with Fungus." News from Native California, vol. 29,       no. 3, Spring2016, p. 19. EBSCOhost,proxy.deltacollege.edu:8080/login?       url=http://search.ebscohost.com/login.aspx?direct=t                 rue&db=aph&AN=113773061&site=eds-live&scope=site.
2 Comments

Asparagus, Meyer Lemon, and Green Garlic Sauce

3/4/2018

0 Comments

 
Picture
Picture
       Early spring: green spears spike into cool, rain-cleared air, fragrant golden lemon globes hang low, and thin, soil-kissed new garlic stalks wait for longer, bulb-setting days.
        This simple sauce captures spring’s essence in a velvety richness. Ushered forth through a tongue-coating Meyer lemon aioli, the gentle flavors of asparagus and green garlic mingle to create a tribute to early spring’s bounty.
        You should prepare this sauce and use it within a few hours--the asparagus will cause the sauce to break if you try to store it for more than 8 hours. Spoon the spring love onto sliced tri-tip, seared salmon, poached eggs, or sautéed Maitake mushrooms.
 
Sauté:
1 cup small diced asparagus
3 tablespoons finely diced green garlic
1 tablespoon olive oil
 
Make the aioli:
1 tablespoon Meyer lemon zest
1 tablespoon Meyer lemon juice
1 egg yolk
1 cup extra virgin olive oil
1 teaspoon chopped capers
1/8 teaspoon hot red pepper flakes
Salt, to taste
 
1. In a sauté pan, slowly cook the green garlic in 1 tablespoon of olive oil on low heat for about 2 minutes, and then add in the small diced asparagus.
2. Cook the asparagus so it is just barely cooked through—this should take about 2.5 minutes.
3. Set aside the asparagus-garlic mixture to cool.
4. Make the aioli:
             A. Place the egg yolk, Meyer lemon juice and zest, and a pinch of salt in a food processor.
            B. Briefly blend the ingredients until they form an emulsion, then slowly drizzle in the extra virgin olive oil with the processor on. Start by adding the oil drop by drop as the processor blade turns. Once 40% of the oil is emulsified, you can speed up the rate at which you add the oil, but don’t go too fast or the mixture will break.
            C. When all of the oil is emulsified, check the mixture for acidity. If you need more acidity, just add another splash of the lemon juice.
           
5. Place the aioli in stainless steel bowl. Whisk in the chopped capers and the cooled green garlic and asparagus mixture. Add the hot red pepper flakes and season with salt to taste.
6. Spoon the sauce over sliced tri-tip, poached eggs, or seared salmon, and serve.

0 Comments
<<Previous
Forward>>

    Author l

    Gabrielle Myers

    RSS Feed

    RSS Feed

    Archives

    September 2020
    July 2020
    May 2020
    March 2020
    February 2020
    December 2019
    November 2019
    October 2019
    August 2019
    July 2019
    June 2019
    April 2019
    February 2019
    January 2019
    November 2018
    October 2018
    August 2018
    July 2018
    June 2018
    May 2018
    April 2018
    March 2018
    January 2018
    December 2017
    November 2017
    September 2017
    August 2017
    June 2017
    May 2017
    April 2017
    March 2017
    February 2017
    December 2016
    November 2016
    October 2016
    September 2016
    August 2016
    July 2016
    May 2016
    April 2016
    March 2016
    January 2016
    December 2015
    November 2015
    October 2015
    September 2015
    August 2015
    July 2015
    June 2015
    May 2015
    November 2014
    October 2014
    July 2014

    Categories

    All

    RSS Feed

Proudly powered by Weebly
Photos used under Creative Commons from quinn.anya, ConstantinWied